Chester Conquest mini mill

Advert

Chester Conquest mini mill

Home Forums Manual machine tools Chester Conquest mini mill

  • This topic has 38 replies, 8 voices, and was last updated 9 May 2018 at 16:48 by John Murphy 3.
Viewing 14 posts - 26 through 39 (of 39 total)
  • Author
    Posts
  • #353036
    John Murphy 3
    Participant
      @johnmurphy3

      The more i think of it i Should of just plunged cut a slot instead of milling a full slot, but it seems to be fine and feels better than it was.

      Edited By John Murphy 3 on 06/05/2018 12:56:37

      Advert
      #353044
      John Murphy 3
      Participant
        @johnmurphy3

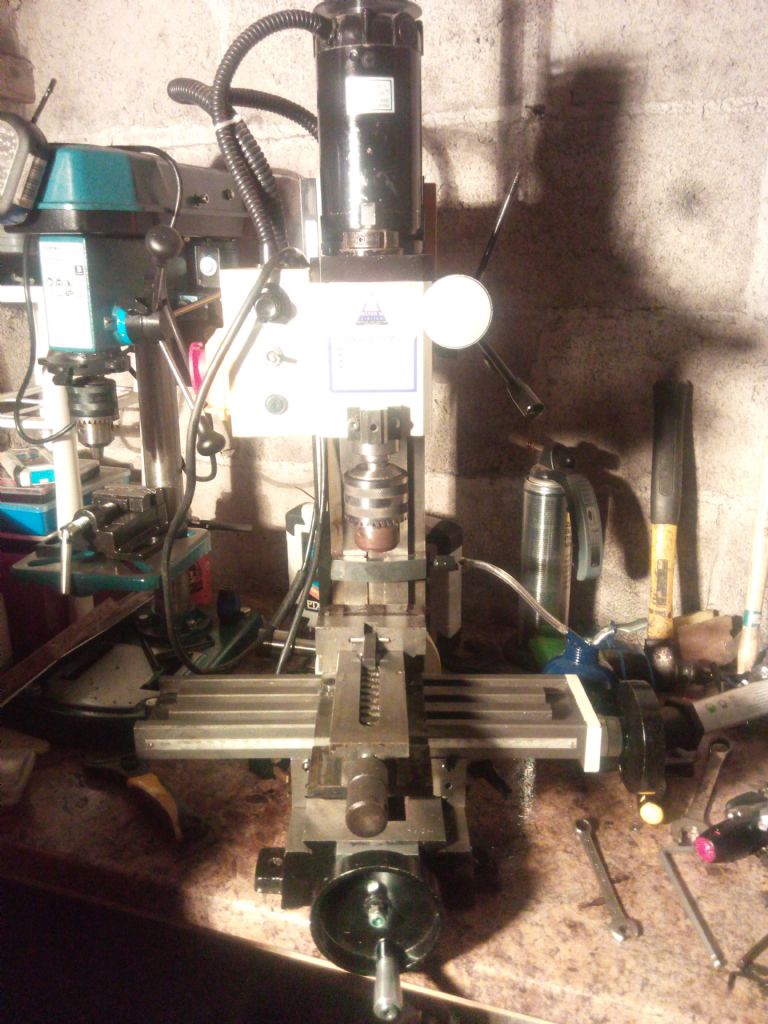
        As it stands of last night, crappy quality pic. I really like this idea in the link(what Ketan said). http://robertsprojects.blogspot.ie/2013/04/mini-mill-solid-column-conversion.html?m=1

        Just attaching the column. Only problem I see is trying to figure out how to mount the base in the ML7 to machine the rear of the base flat lol. I made a quick wheel handle for the Y as it was missing. Also need bellows and a gib lock for the X. I need to take the gib out of the Z and have a look at that, then its tramming everything and make some cuts

        img_20180505_234905.jpg

        Edited By John Murphy 3 on 06/05/2018 13:44:41

        Edited By John Murphy 3 on 06/05/2018 13:45:44

        Edited By John Murphy 3 on 06/05/2018 13:50:38

        #353146
        Russell Eberhardt
        Participant
          @russelleberhardt48058
          Posted by Ketan Swali on 04/05/2018 21:35:39:For a more qualified idea, you would need to get a response from real users, such as Neil and Russel, who have similar or variants of SIEG mini-mills. Neils machine has the same motor as yours I think.

          My mill is a SX2P which has a more powerful motor. I have converted it to cnc and it has mainly been used for small precision parts for clockmaking. I have a bigger mill for heavy work so I can't really comment on the maximum DOC which will of course depend on your requirement for accuracy and finish.

          Russell

          #353173
          John Murphy 3
          Participant
            @johnmurphy3

            Thanks Russell, are you using ball screws with your conversion?

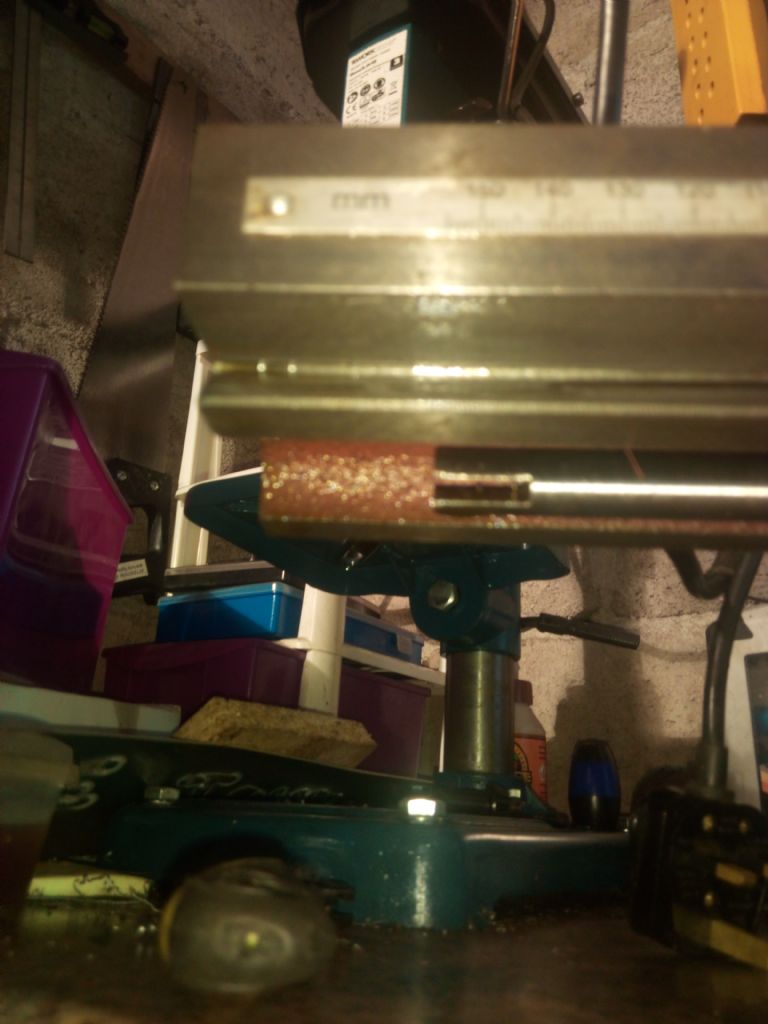
            Another thing a noticed is the lead screw for X doesn't come all the way up to the edge of the table. It still has the full range of movement though (300mm)

            img_20180507_095909.jpg

            #353180
            Oldiron
            Participant
              @oldiron

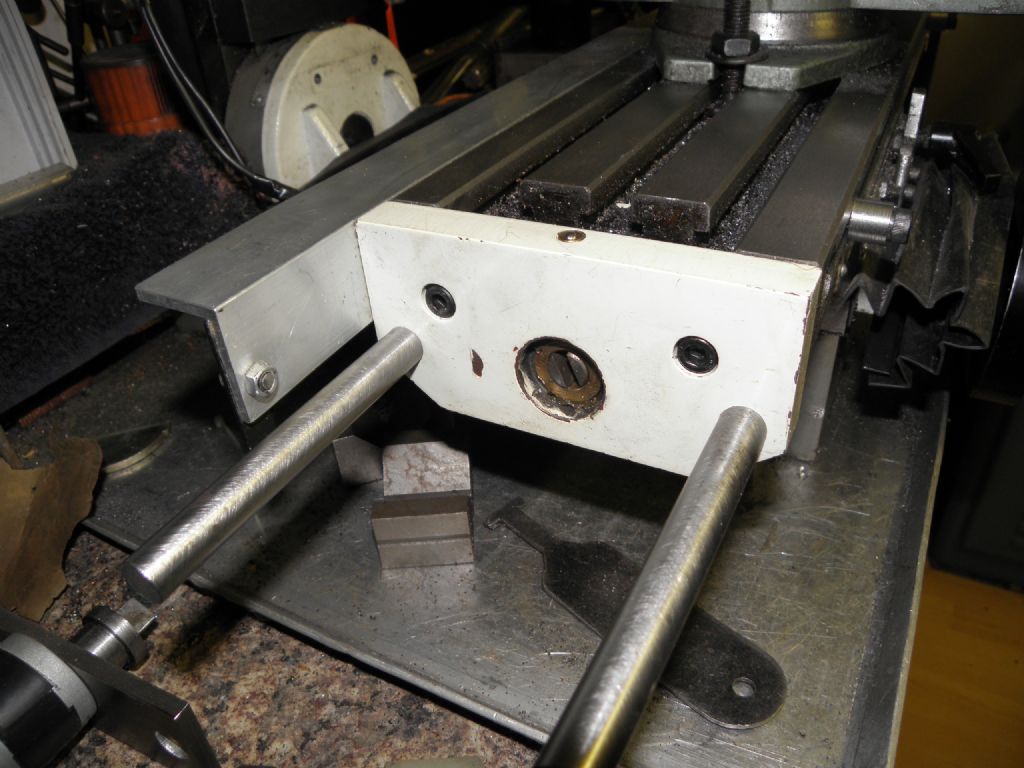
              Hi John. I think you have a couple of parts missing there.

              1. The end plate.

              2. The lead screw length adaptor which I believe was fitted on some of the extended table versions of this mill.

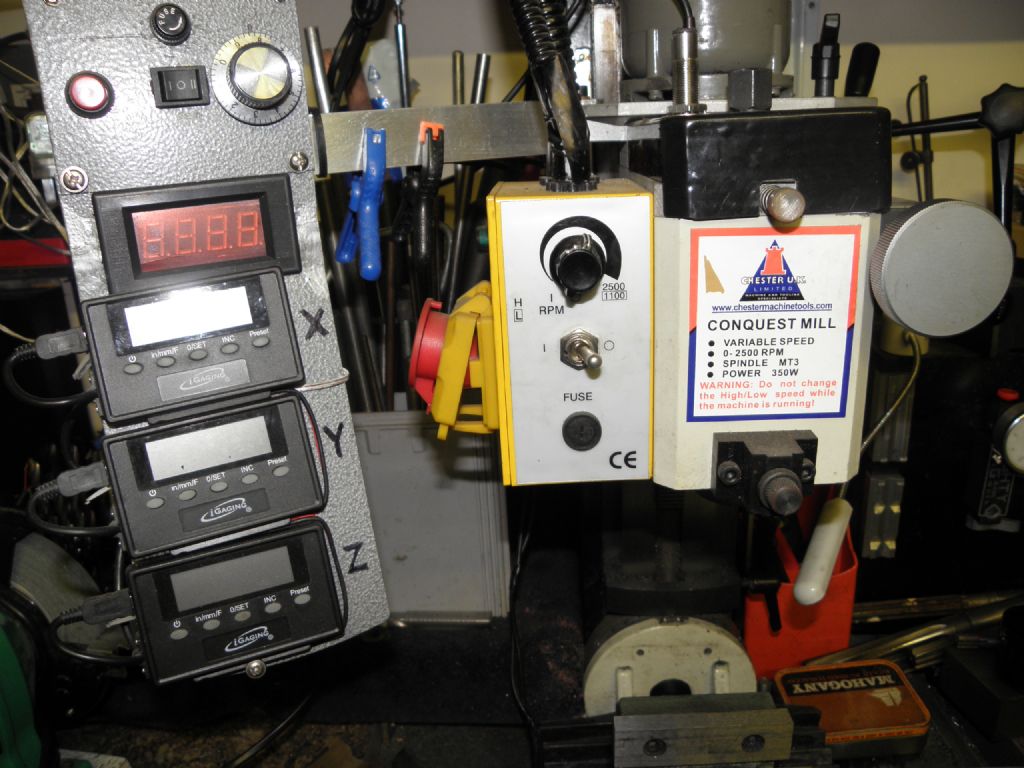
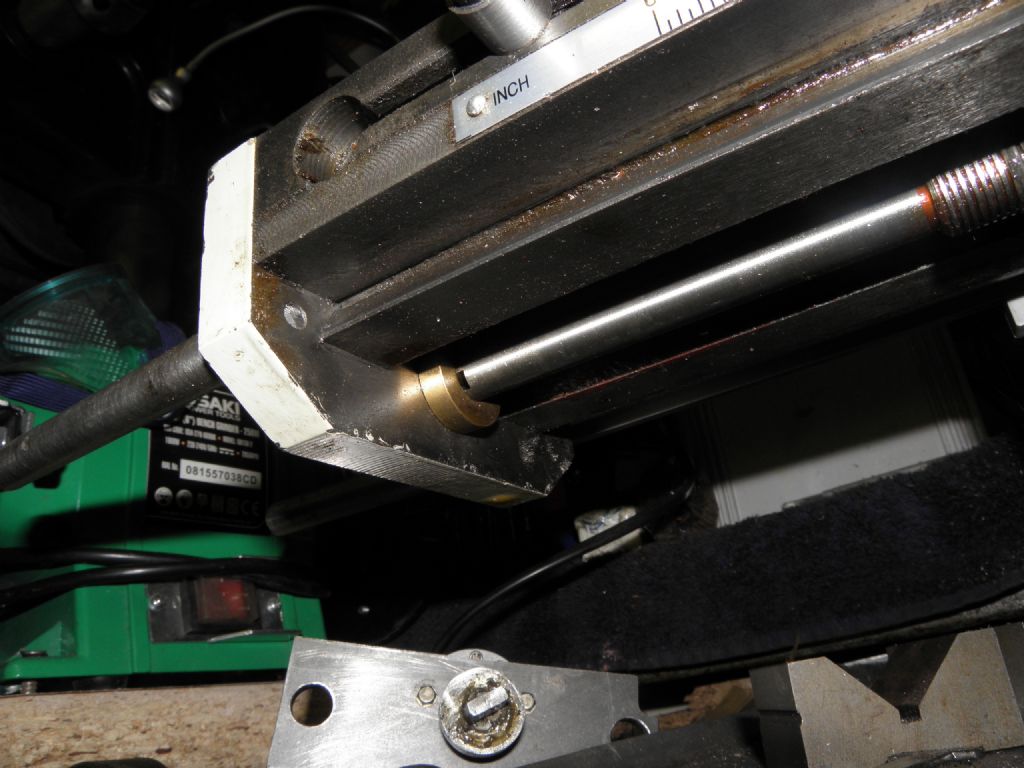
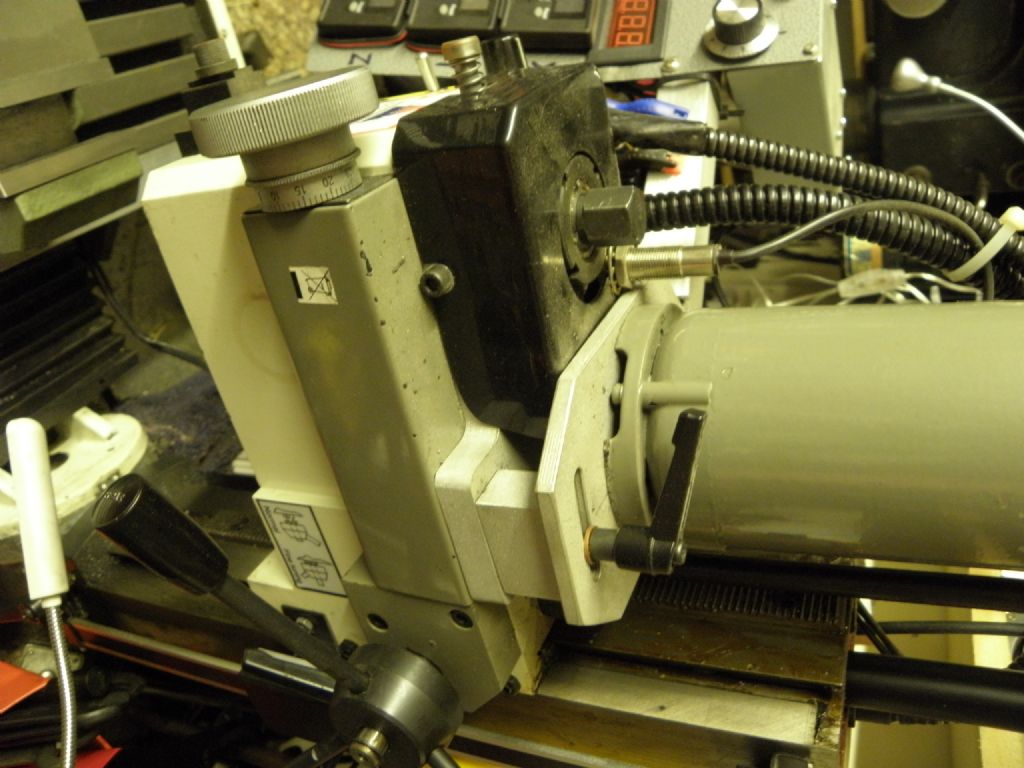
              Here are some photos of my mill I took a while ago. A few things have changed but you should get the idea.

              My lead screw came full length as standard. I use the slot in the end for the table drive motor. The 2 S/S 12mm bars on the end plate are what the table feed motor assembly is mounted  on. The top control panel is for table motor speed and direction & speed indication. You can see the speed sensor behind the drawbar nut. I have now made a new control panel & the DRO scales are attached to a bluetooth sender and viewed on a tablet using Yuri's software. If you want measurement let me know.

              regards

              p5070004.jpgp5070003.jpgp5070001.jpgp5070006.jpg

              Edited By Oldiron on 07/05/2018 13:41:35

              Edited By Oldiron on 07/05/2018 13:48:47

              Edited By Oldiron on 07/05/2018 13:49:47

              #353187
              John Murphy 3
              Participant
                @johnmurphy3

                That’s a nice big motor , what board is running it? So your lead screw , is it one machined part , is is there an extension on the end of it to bring it out to the end of the table ? I can machine up a new end plate by copying the other side. I was looking up the Bluetooth dro, I’ll also do this in time , I have adruino uno r3 sitting idle.

                Edited By John Murphy 3 on 07/05/2018 14:50:58

                #353188
                John Rudd
                Participant
                  @johnrudd16576

                  The Chester Conquest mill that I had differed slightly to yours…..mine had a bigger 550 watt brushed motor driven by a KB Controls circuit board…unfortunately my motor gave up on me, I got a replacement from Amadeal for around £90…. Sold the mill on after that..

                  #353197
                  Oldiron
                  Participant
                    @oldiron

                    Hi John.

                    The main motor is the one supplied with the mill.

                    The Table feed motor was from Ebay. 12vdc with 60rpm all metal reduction gearbox. £14

                    The controller for it is a 12dc reversible PWM type also from Ebay. £9

                    The speed readout was another Ebay purchase. £6

                    I use a PC 600 watt power supply for the 12vdc

                    The red button on the control panel in the previous post is to fast traverse without changing the speed settings.

                    The lead screw is as supplied full length with the mill. I am sure that the early longer bed mill had an adaptor to extend the length of the original shorter lead screw. It would be easy to make one and pin to lead screw if you have a lathe.

                    regards

                    #353208
                    John Murphy 3
                    Participant
                      @johnmurphy3

                      Thanks John Rudd didn’t know they came with a 550w motor.

                      Old Iron thanks, yes I’ll make something up on the lathe. Was curious if they came that way originally. I’m nearly sure it came with a plastic cover plate , makes sense if the lead screw wasn’t even supported.

                      Tramming the machine at the moment. Noticed a lot of flex fwd and aft pulling or pushing the column. I’ll try get a clip of it later. How do you tram them fwd and aft ? Shims ?

                      Edited By John Murphy 3 on 07/05/2018 18:33:28

                      #353232
                      John Murphy 3
                      Participant
                        @johnmurphy3

                        As you can see from the video its off quite a bit fwd and aft. The starting point at 0 is also just about 0 when I swing it over the other side of the table to check the tramming. It was way out before I reset it. Also the end of the video I'm putting pressure on the head and also pushing/pulling the column. That's the amount of flex/movement. The head gibs where locked and also Y where locked.

                        How do people adjust fwd and aft ? Shim the head or the base of the column. Also any idea why its flexing so muchhttps://youtu.be/xmvdDNTE0ls

                        Edited By John Murphy 3 on 07/05/2018 22:40:51

                        #353269
                        Ketan Swali
                        Participant
                          @ketanswali79440

                          John M,

                          Few points:

                          – the first and last time your machine was probably 'trammed' was just before it left the factory.

                          – Tramming is a skill in itself. If you are not sure, leave it alone and get on with milling (and I know that this is against popular advice). In the old days, a machine tool fitter would have been sent with the machine to do the necessary, before the user got on with using a mill. This is out of question for a lovely cheap machine. Also, as far as I am concerned, most of the great machine tool fitters have progresses into heavenly pastures. Handful exist, rest of us have to experiment, and very few are gifted with perfecting this area, especially when it comes to scraping or shimming. YouTube is full of good, bad and ugly.

                          – If you are intending to shim, it should be between the columns base, and the base casting. Keep in mind, if you shim in one location, it will effect other positions – i.e. left/right, front/back. If you are lucky, all will go well until the next time you tilt the column. Best to never tilt the column, if and once you have set it. Forget about scraping at the moment.

                          – If you do not want to shim the column to the base, and if your work is critical, consider shimming the work piece onto the milling table, as many do, especially in the U.S.. Some on here consider that option to be sacrilege.

                          – Flexing of the column/head: You said that you have locked the Z axis gib. That's good. I presume that the big locking nut at the back of the column is locked too – i.e. well tight. Leaning/pulling of head will bring about a certain level of flex, especially with the type of column you have. Note: before anyone tells you otherwise, you will find this if you lean on a Bridgeport head too.. be it less, due to more rigidity. Solutions exist from doing what Neil Wyatt did to various others – be they good or bad, to changing the column to a fixed column. All such options will reduce the flex, but not remove them completely. As I said, you can lean on a Bridgeport head too and there will be a small degree of movement, and I don't care if someone tells you otherwise.

                          Keeping above in mind, 'zero' everything the best you can without addition of shims or anything, and start using the machine. Next, keep the flexing in mind, and avoid 'forcing' anything during the milling process, keeping within the limitations of the machine. Note: as originally supplied – with the tilting column, there are hundreds of thousands of such mini-mills around the world, doing the same job, since 1986 (around the time they were born I think), with good, bad and ugly results, depending on many factors, including how good/bad/ugly/heavy handed the users is.

                          Once you start using the machine, You will start getting a real idea of niggles. When dealing with niggles, deal with one niggle at a time. Avoid dealing with all of them at the same time. Identifying and dealing with a niggle will only come with experience over time…. for your particular requirement. Sometimes, a niggle is not really a niggle/issue, but usually blown out of all proportions…. especially on You Tube… by those blessed with low or no mechanical knowledge, or idea of limitations of the machine. There are still a few on You Tube who do have a clear understanding, and they do do things to the machine to meet their particular needs.

                          Anyway, do consider getting or making the left hand table bracket/mount. Looking at some of the pictures, it would seem that it is important to support the X axis screw in the case of your machines table.

                          Ketan at ARC.

                          #353285
                          John Murphy 3
                          Participant
                            @johnmurphy3

                            Funny you said that ketan , I trammed it yesterday and just used it today. Went through bright mild steel with an 8mm 4 flute with 1mm DOC. So very pleased with that. Thanks again ketan for your responses it really helped.

                            #353344
                            Russell Eberhardt
                            Participant
                              @russelleberhardt48058
                              Posted by John Murphy 3 on 07/05/2018 12:21:24:

                              Thanks Russell, are you using ball screws with your conversion?

                              No, I'm using the original leadscrews but with ball thrust bearings fitted and adjustable Delrin nuts. Full details of my conversion are detailed here.

                              Russell

                              #353384
                              John Murphy 3
                              Participant
                                @johnmurphy3

                                Thanks Russell

                              Viewing 14 posts - 26 through 39 (of 39 total)
                              • Please log in to reply to this topic. Registering is free and easy using the links on the menu at the top of this page.

                              Advert

                              Latest Replies

                              Home Forums Manual machine tools Topics

                              Viewing 25 topics - 1 through 25 (of 25 total)
                              Viewing 25 topics - 1 through 25 (of 25 total)

                              View full reply list.

                              Advert

                              Newsletter Sign-up