Tail alignment and gear handle play

Advert

Tail alignment and gear handle play

Home Forums Manual machine tools Tail alignment and gear handle play

Viewing 20 posts - 76 through 95 (of 95 total)
  • Author
    Posts
  • #195719
    David Cambridge
    Participant
      @davidcambridge45658

      Jason – fair point with regards to the reamer and I have come to grief exactly as you say. My problem is that worrying about this sort of thing is a very slippery slope for me, and before you know it I’ll be on the phone falling out with Warco, sending the lathe back and forth to get it sorted, or worse still trying to fix it myself and making it worse. All in all, that would just spoil the hobby for me. So ,recognising both my own failings and the lathes failings, and taking the chuck over to the mill to do the reaming got me past the problem. Again, not suitable for every occasion but OK for me!

      Advert
      #195722
      Ajohnw
      Participant
        @ajohnw51620

        There are 2 sides to every coin. Maybe the alternative to buying a "casting kit" is to buy a used lathe. The problem with used lathes is that wear can produce similar accuracy problems though if the lathe was well made the they will largely relate to the headstock spindle and the bed with a fair chance when this has happened that the slides wont adjust correctly as well.

        Costs of thing like lathes can be more complicated than they may appear. If cnc machines are used then they don't come for free and time on them has to be paid for. It's very expensive time too due to the cost of the machine. Lathes have their problems as well. The usual answer to obtaining stable castings is to leave them lying around for a couple of years, preferably outside as the rust will help break down the tough skin they tend to have easing machining.I suspect the castings need to be allowed to cool very slowly too and might even receive some heat treatment to help.

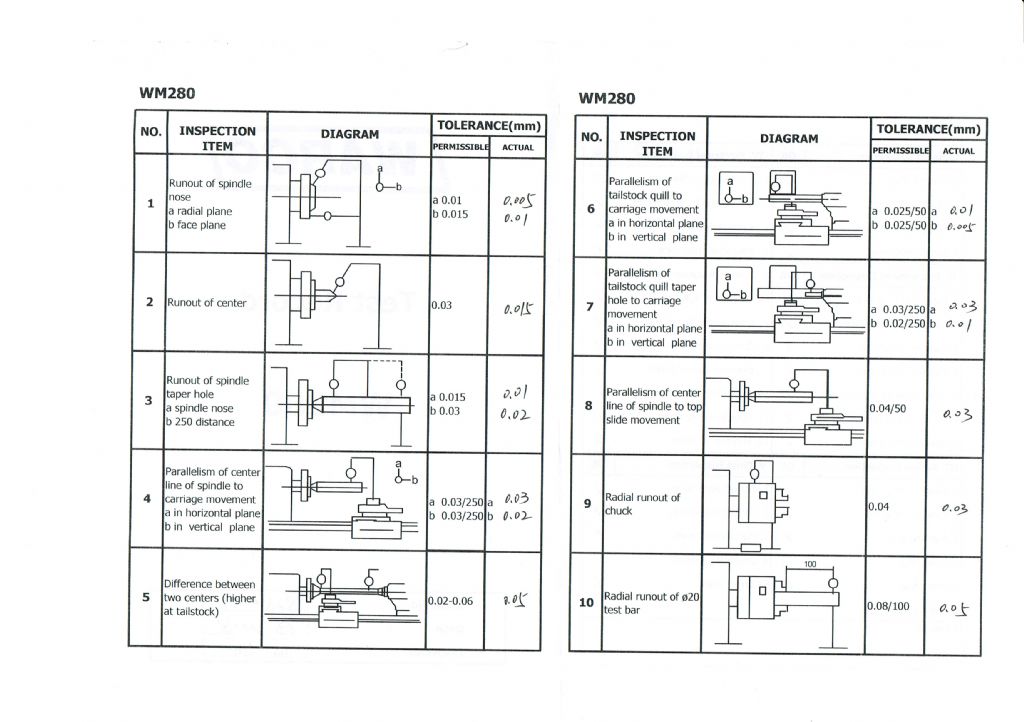
        I'd love to see a copy of a warco test report on this level of lathe – can some one post a legible photo of one.

        John

        #195723
        Nitai Levi
        Participant
          @nitailevi73768

          Thanks again to everyone and it's good that this thread had a lot of related info too.

          Re used lathes, I would definitely buy one if I found a good one with the features I wanted. I didn't.
          I would buy one of the new European ones I found that cost from 2.5 to 4 times more than the Sieg (without accessories) but same problem, either too big or other compromises.

          As JasonB pointed out, turning is the minor issue and drilling/reaming is the main issue with the high tail.

          David Cambridge, thanks for this drawing and I can see your point re your other post. However I don't have a mill for that (I have a tiny one for some specific things). Also it is not just a hobby for me. I repair musical instrument, which is one of my hobbies and jobs, but the lathe is just a tool to be able to do that, just like any other tool really.
          I like to watch some videos of machine shops on youtube. It seems that many like modifying the lathe and it is sometimes part of the hobby itself.
          I already spent 20-30 hours adjusting it and accepted that I had to do that

          Edited By Nitai Levi on 04/07/2015 09:56:13

          #195733
          Neil Wyatt
          Moderator
            @neilwyatt

            > I'd love to see a copy of a warco test report on this level of lathe – can some one post a legible photo of one.

            In MEW 231 there will be a review of the new Warco WM280V and thje test sheets are included in the article.

            Neil

            #195737
            Neil Wyatt
            Moderator
              @neilwyatt

              > It seems that many like modifying the lathe and it is sometimes part of the hobby itself.

              It has been so for me, although I must admit most of my inspiration came from reading older articles about how people had improved their Myfords as there wasn't much information out there of mini-lathes when I started!

              #195742
              Bowber
              Participant
                @bowber

                I'll add mine to my photo's later. I kind of get the impression that it's kidology though, I don't even really believe they have really done the test at the factory and just write random figures down though I've not done my own tests to confirm

                Steve

                #195745
                Neil Wyatt
                Moderator
                  @neilwyatt
                  Posted by Bowber on 04/07/2015 11:44:33:

                  I'll add mine to my photo's later. I kind of get the impression that it's kidology though, I don't even really believe they have really done the test at the factory and just write random figures down though I've not done my own tests to confirm

                  Steve

                  That's quite a statement to make if you haven't made any tests.

                  Neil

                  #195747
                  Neil Wyatt
                  Moderator
                    @neilwyatt

                    OK, for the record, I'm going to make as many of the Schlesinger tests as I practically can on my mini-lathe.

                    It's a Clarke CL300M the supplied chuck has the date of 1998, although I bought it in 1999. It is my only lathe and has had 15 years of moderate hobby use. The bearings have been changed to taper rollers. It is free standing, so bed levelling checks are not possible and I haven't got an MT test bar, but I can do the 'turn round' check for spindle alignment instead.

                    I will be using an East-German DTI which is graduated to 0.0005" and easily estimated to 0.0001".

                    Neil

                    #195748
                    JasonB
                    Moderator
                      @jasonb

                      here you go, This is for one of the first WM280-VF lathes that warco did dating from March 2008, will be interesting to compare with the new one in MEW.

                      I've not checked any of these things, I seem to be able to make reasonable engine son it so can't be bothered looking for tenths if teh engines run and look OK. Click for larger image.

                      280test.jpg

                      #195749
                      Bowber
                      Participant
                        @bowber
                        Posted by Neil Wyatt on 04/07/2015 13:22:35:

                        Posted by Bowber on 04/07/2015 11:44:33:

                        I'll add mine to my photo's later. I kind of get the impression that it's kidology though, I don't even really believe they have really done the test at the factory and just write random figures down though I've not done my own tests to confirm

                        Steve

                        That's quite a statement to make if you haven't made any tests.

                        Neil

                        Not really, it's just what what I believe and I'm happy to be corrected.
                        For instance my centres show a similar visual amount of miss alignment as the OP but the test sheet certainly doesn't show that amount. However I don't posses accurate enough centres and test bars to check it properly and I can't be bothered to make them either, the lathe does what I need anyway so I'm happy using it.
                        I can check a few things though so in the interests of fairness I'll check them after I've done the present job in the lathe and compare them to the test sheet.

                        Steve

                        #195753
                        Bowber
                        Participant
                          @bowber

                          Firstly, I'm more than happy with my WM280V so please don't get the impression from my comment that I'm not.

                          I've checked item 6 on the test sheet "Parallelism of tailstock quill to carriage movement" and I got similar results to the test sheet.

                          a – Sheet 0.02mm mine – 0.022mm so the same with rounding down (0.0009&quot
                          b – sheet 0.03mm mine – 0.015mm so better than the sheet (0.0006&quot

                          I'll upload my test sheet to my album – I got the impression that these tests are done at the factory in China and not by Warco in the UK

                          I used an imperial dti and guestimated the movement due to it being less than one division.

                          Non of which helps the OP in his quest for better accuracy on his machine.

                          Steve

                          #195754
                          Michael Gilligan
                          Participant
                            @michaelgilligan61133
                            Posted by Bowber on 04/07/2015 14:59:18:

                            I got the impression that these tests are done at the factory in China and not by Warco in the UK

                            .

                            Steve,

                            Just out of curiosity, I had a look at Warco's site

                            For the WM 280V they make the following statement:

                            • Each lathe is fully run and tested by a qualified member of our team before leaving our premises, and will be supplied with an individual accuracy test report.


                            As 'Contracts' man, I find this ambiguous regarding 'location of test' , but at least it does seem clear that the lathes are individually tested for accuracy.

                            Although this is [to me] of academic interest only: It may be useful if Warco could clarify the point at which the 'individual accuracy test report' is generated.

                            MichaelG.


                            Edited By Michael Gilligan on 04/07/2015 15:34:18

                            #195756
                            Ajohnw
                            Participant
                              @ajohnw51620

                              My understanding is that Warco do the tests not the manufacturer. Those figure look pretty good really and I would hope that they are always generally within limits.

                              Me – if done in the factory or what ever and they didn't seem to be correct – send it back, supplier to pay return costs.

                              Actual turning is the final test on any lathe. In real terms that is the one that counts but some reassurance via a dti does indicate what the lathe is likely to do. Then it's a case of the user making sure that they always take play out of the lead screws when setting cuts and and also to set sensible amounts of drag on the gibs. That can be important on some lathes even rather large ones.

                              Personally if any doubt I do feel that it's worth the minimal amount of effort needed to make a between centres test bar and or just to do a few very simple turning tests.

                              John

                              #195762
                              Neil Wyatt
                              Moderator
                                @neilwyatt

                                I've given up for now. it's too damn hot.

                                My tailstock was about 0.004"high and I've ignored my own advice and skimmed the tailstock adjustment joining faces on the mill and got it to about a thou which I will now ignore. The PITA is that my home made lever lock has got out of adjustment and I can't find the sweet spot

                                What else have I done:

                                test – target – actual (all converted to thou)

                                Work spindle centre point for true running 0.0004 0.00025

                                Centring sleeve (chuck register?) for true running 0.0004 <0.0001

                                Work spindle axial slip measured at 2 points displaced by 180 degrees 0.0004 0.0002

                                Lead screw axial slip 0.004 none detectable

                                Lathe turns round within 0.0004 no out of round detectable

                                I know it failed the faces concave by no more than 0.008 in 12" test as supplied (there was a batch of early machines that suffered from this) but I cured this some time ago by skimming the cross slide dovetails.

                                The rest can wait…

                                Neil

                                #195771
                                Enough!
                                Participant
                                  @enough
                                  Posted by JasonB on 04/07/2015 07:23:15:

                                  David as you have shown its not so bad when turning. Now put a 3mm reamer in the tailstock chuck and see what happens, the top edge of the reamer will be high by 0.15mm so in effect acting like a boriong bar taking a 0.15mm cut as it tries to straighten itself so your hole will be double that at 3.3mm which is certainly more of a problem than the O.009mm on dia whan turning.

                                  floating reamer holder perhaps?

                                  #195945
                                  Nitai Levi
                                  Participant
                                    @nitailevi73768

                                    I've done a bit more scraping and definitely see the tail is lower… but still high. so some improvement.

                                    I found something strange and need to do more tests. When I put two dead centers and adjust by eye and something thin between them, then I get a really bad side to side alignment if checking with a puppitast and vise versa if I adjust using the puppitast and then look at two dead centers (they are very obviously off).

                                    The main difference is the distance of the test. With the dead centers the head and tail are very close (as close as they can be). With the puppitast the tail is probably about half way on the bed, though I have a shorter puppitast holder that I didn't yet use for this test (I will).

                                    So I suspect a significant bed alignment problem…
                                    Hopefully in a week or two I will finally be able to do more through tests using a test bar between centers.

                                    #196161
                                    Nitai Levi
                                    Participant
                                      @nitailevi73768

                                      OK, I'm not sure how I missed it before, but I just found that there is a gross sideways misalignment between the spindle and bed. This is what causes the tail to seem aligned with the spindle only close or far. I'm considering contacting the store and asking about replacing the lathe, but after all the work I've done on it which I'll have to redo…

                                      #196183
                                      Michael Gilligan
                                      Participant
                                        @michaelgilligan61133
                                        Posted by Nitai Levi on 08/07/2015 18:16:53:

                                        OK, I'm not sure how I missed it before, but I just found that there is a gross sideways misalignment between the spindle and bed. …

                                        .

                                        crying

                                        I hope it goes well.

                                        MichaelG.

                                        #196593
                                        Nitai Levi
                                        Participant
                                          @nitailevi73768

                                          Thanks. After disassembling everything I see that it would have been a good idea anyway, to clean, remove any extra paint, grit, burs, etc. I'll check alignment after this and go from there.

                                          For now I installed the new angular contact bearings.

                                          #197997
                                          Nitai Levi
                                          Participant
                                            @nitailevi73768

                                            Thanks again everyone. In the end I found a few issues that I missed before and had to disassemble the head to fix them. It took a while but in the end it was good so worth it and the alignment of the head and tail is good.

                                          Viewing 20 posts - 76 through 95 (of 95 total)
                                          • Please log in to reply to this topic. Registering is free and easy using the links on the menu at the top of this page.

                                          Advert

                                          Latest Replies

                                          Home Forums Manual machine tools Topics

                                          Viewing 25 topics - 1 through 25 (of 25 total)
                                          Viewing 25 topics - 1 through 25 (of 25 total)

                                          View full reply list.

                                          Advert

                                          Newsletter Sign-up