Hardening Silver steel Cutter

Advert

Hardening Silver steel Cutter

Home Forums Beginners questions Hardening Silver steel Cutter

Viewing 17 posts - 1 through 17 (of 17 total)
  • Author
    Posts
  • #458816
    Chris TickTock
    Participant
      @christicktock

      Hi,

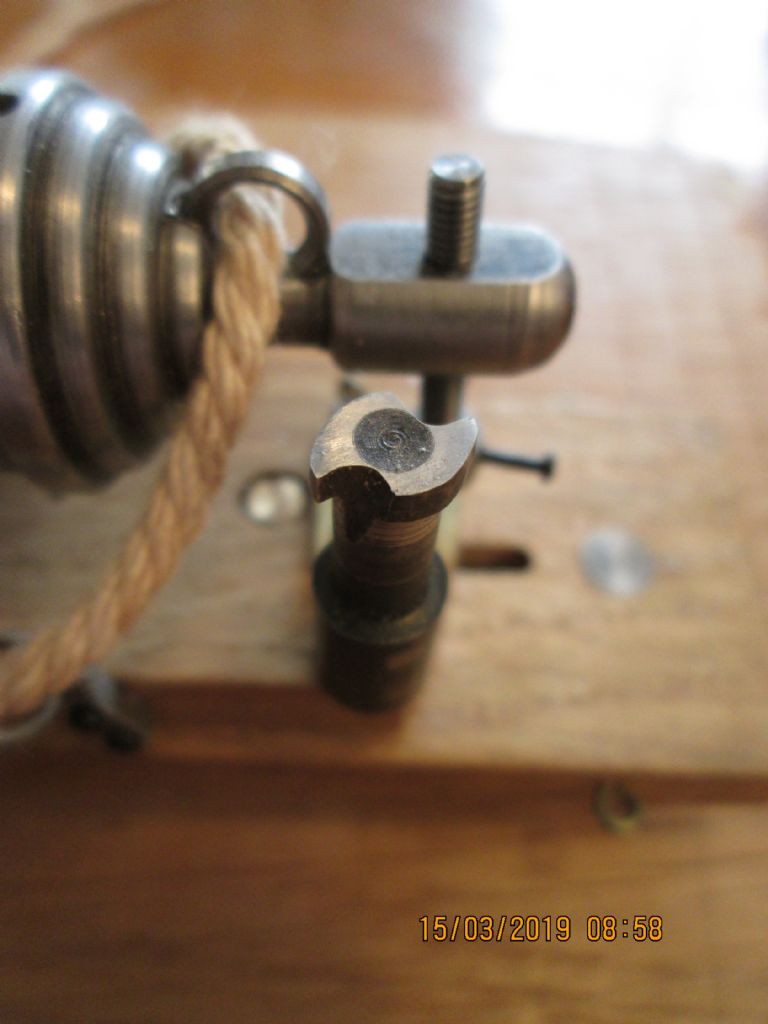
      Now my knowledge to date with regard to hardening a piece of silver steel after machining it comes down to heating it to cherry red then quenching in water or brine. The object I wish to harden is a 1/4 inch square silver steel clock wheel cutter, this one will be used to cut brass but other may be used to cut pinions in harder steel.

      Issues; I have come across a post referring to the risk of burning off finer parts of the cutter when heating and that you should bring the temperature up in a more staged process.

      has anyone got any recommendations as to a good attack plan. I have a Smith little torch with oxygen and propane as well as various hand torches if needed.

      i intend tempering after but wounder what temperature is best for this cutter.. I usually use a toaster oven for tempering but am in the process of making a PID controlled enclosed unit that may or maynot tiurn out to be useful.

      Chriscutterprehardened.jpg

      Edited By Chris TickTock on 22/03/2020 10:15:16

      Advert
      #10126
      Chris TickTock
      Participant
        @christicktock
        #458824
        Emgee
        Participant
          @emgee

          Chris

          I would use a flame large enough to bring the working end of the tool to cherry/carrot as quickly as possible, hold at that temp for a short period before quenching, I normally quench in oil and do not bother with tempering but if quenching in water /brine perhaps you should temper, no doubt others will add to this.

          Emgee

          #458829
          Bob Stevenson
          Participant
            @bobstevenson13909

            I use the same process for most silver steel items, both cutters and clock parts……..you only really need to harden the areas that are going to do the work…..for cutters, set the piece up in a corner of the hearth where most of the heat will be reflected and get the cutting tip to red heat…allow to remain red for half a minute or so and then quench quickly….water will give a quick thru quench proividing there is enough volume of water and you should 'stir' the piece around quickly to disipate heart as fast as you can. Oil will give a somewhat 'softer' quench which can sometimes be handy.


            …..clean the piece with abrasive paper or wire wool and heat the rear end…allow the colours to creep along the piece until the right temper (usually 'straw' for me) reach the cutting edges. If you wish you can wind the piece in iron/steel wire and coat with soap to keep the piece bright while heating to red heat.


            For clock pivots;……it's quite common to see beginning clock repaiers/makers snap off their pivots be accident ……for this reason it's better to only harden the very ends of arbours..ie the pivot sides…if the main part of the arbour remains softer there is less chance of the pivot snapping off.

            Edited By Bob Stevenson on 22/03/2020 10:56:21

            #458849
            SillyOldDuffer
            Moderator
              @sillyoldduffer
              Posted by Chris TickTock on 22/03/2020 10:14:59:

              Hi,

              Now my knowledge to date with regard to hardening a piece of silver steel after machining it comes down to heating it to cherry red then quenching in water or brine. The object I wish to harden is a 1/4 inch square silver steel clock wheel cutter, this one will be used to cut brass but other may be used to cut pinions in harder steel.

              Issues; I have come across a post referring to the risk of burning off finer parts of the cutter when heating and that you should bring the temperature up in a more staged process.

              has anyone got any recommendations as to a good attack plan. I have a Smith little torch with oxygen and propane as well as various hand torches if needed.

              Chris


              A bad attack plan is the Smith Little Torch with Oxygen. It produces a small high-temperature flame, ideal for making small lumps of metal very hot in one particular place, but rotten for this job, ie warming a relatively large cutter to a consistent red heat without overheating the thin cutting edge.

              I'd lay the tool on a heatproof insulating brick with a couple of bits of wire underneath to allow space for flame to penetrate underneath. Then, in a dim indoors light, I'd heat the tool from the fat end with an ordinary DIY Store type Butane Torch. Compared with a Smith, they produce much more heat at a lower temperature, which is what's wanted hereat .

              The goal is to heat the whole tool cherry red without going bright red, orange or yellow at the tip. Hold the tool tool at red heat for a few minutes, then pick up with pliers and as quickly as possible stir vigorously deep into a litre or two of cold water.

              Silver steel is quite forgiving; it's also possible to hold a cutter like yours in a mole wrench and heat it by hand in air. Requires a bit more skill – the insulating brick makes it easier to control the heat; neither too hot, or too cold, or wild excursions.

              I wouldn't bother tempering if the cutter is for Brass. Tempering swaps hardness & brittleness for toughness, which is useful when the tool is cutting steel, but cutting brass is less likely to break a brittle tool , and the edge will last longer if it's left very hard. Tempering isn't critical, heat to about 200C ±20°C for about an hour and then allow to cool slowly to room temperature in the oven.

              Dave


              Edited By SillyOldDuffer on 22/03/2020 11:56:49

              #458861
              Chris TickTock
              Participant
                @christicktock

                For clock pivots;……it's quite common to see beginning clock repaiers/makers snap off their pivots be accident ……for this reason it's better to only harden the very ends of arbours..ie the pivot sides…if the main part of the arbour remains softer there is less chance of the pivot snapping off.

                Edited By Bob Stevenson on 22/03/2020 10:56:21

                Thanks Bob duly noted

                Chris

                #458864
                Chris TickTock
                Participant
                  @christicktock

                  Going back to heating to cherry red it has been suggested if I stuck the flame on the weakest end part of the cutter is there a risk it would be damaged?

                  Chris

                  #458865
                  Bob Stevenson
                  Participant
                    @bobstevenson13909

                    Yes,…although it has to be a fierce flame, it's better to heat generally and wait until the cutting edge/tip is red then there can be no flame damage. If you watch gas welders they always take care where they put the flame, but theirs is a very fierce flame…

                    #458869
                    Chris TickTock
                    Participant
                      @christicktock
                      Posted by Bob Stevenson on 22/03/2020 12:37:17:

                      Yes,…although it has to be a fierce flame, it's better to heat generally and wait until the cutting edge/tip is red then there can be no flame damage. If you watch gas welders they always take care where they put the flame, but theirs is a very fierce flame…

                      Thanks Bob, the next thing I need to buy are a few soft fire bricks to make a heat trap which will help retain the heat.

                      Chris

                      #458872
                      Bob Stevenson
                      Participant
                        @bobstevenson13909

                        Do yourself a favour and buy a nice little kit from Cup-Alloys…they do 'vermiculite' type blocks which don't absorb the heat…also get some 'thermal wool' from them….drop it over the piece and heat thru the side gap…it prevents almost all of the heat loss and the piece goes red very quickly…

                        ……….I have no connection with Cup-Alloys other than as a very satisfied user…for years I was a gas welder and had many other methods of heating/soldering but when I got into clock making I got a kit from Cup-alloys (a very nice present from my nearest and dearest, bless her heart!) and I have never looked back with small clock type jobs.

                        #458884
                        IanT
                        Participant
                          @iant

                          For a small tool – wrap some copper wire right around it (including the cutting edges) and use the other end of the wire to hold it with pliers. Some also use a soft soap coating to help protect the steel (and help with the clean-up afterwards) but I've not tried that myself yet.

                          "Cherry Red" is hard to gauge in most good lights – so try doing this outside in the evening or inside with only dim lighting on. Hold that colour for about a minute. I use brine and 'swirl' it before dipping the tool in vertically. I cannot tell you if this makes any difference (or not) but that's the way I read it should be done and have therefore always done it that way. It seems to work, which is the most important test I guess. I temper all my tools.

                          Regards,

                          IanT

                          Edited By IanT on 22/03/2020 13:46:25

                          #458886
                          Bazyle
                          Participant
                            @bazyle

                            Nobody has mentioned the trick in all the old ME articles of covering the sharp end with 'soft soap' – which would have been a lump of brown or green stuff as opposed to the caustic used for washing the floor. You can use your wife's hand soap unless you think she would object.
                            The idea is that the soap decomposes into a char that keeps the raw flame and oxygen off the tip.

                            Tempering has been mentioned as possible in the domestic oven (while baking some bread that uses a hot oven) however the usual method is to heat the body of the tool, not the tip, and as the clean shiny tip gets hot it oxidises forming a brown oxide layer. The darkness of the oxide layer is a combination of time and temperature so is used to make a guess at progress, hence advice to finish by quenching at 'light straw' of 'dark straw'. By 'straw' it is not referring to the bright red plastic one of course so this isn't going to work for the younger generation.

                            #458890
                            Mick B1
                            Participant
                              @mickb1

                              I made the little cutter in the foreground about a year ago from 8mm silver steel, to cut a recess for a breeching-rope ring in the cascabel of the carronade.

                              I heated it up with an ordinary butane blowlamp, carrot-red as near as I can describe it, quenched in plain water, stoned the face bright and then heated the stem until the face began to go straw-coloured – again as near as I could get it – then let it cool in air.

                              It cut some nice mild steel like it was cheese. Looking at the picture now, I think I should've cut closer to the step in the cascabel so as to blend the ring in better. Maybe during the current house-arrest I'll find some time to do that.

                              cascabelring2.jpg

                              #458914
                              Chris TickTock
                              Participant
                                @christicktock
                                Posted by Mick B1 on 22/03/2020 14:10:14:

                                I made the little cutter in the foreground about a year ago from 8mm silver steel, to cut a recess for a breeching-rope ring in the cascabel of the carronade.

                                Having just looked up what cascabel and carronade mean I can say it looks fine to me.

                                Chris

                                #458916
                                Chris TickTock
                                Participant
                                  @christicktock
                                  Posted by IanT on 22/03/2020 13:44:21:

                                  For a small tool – wrap some copper wire right around it (including the cutting edges) and use the other end of the wire to hold it with pliers. Some also use a soft soap coating to help protect the steel (and help with the clean-up afterwards) but I've not tried that myself yet.

                                  "Cherry Red" is hard to gauge in most good lights – so try doing this outside in the evening or inside with only dim lighting on. Hold that colour for about a minute. I use brine and 'swirl' it before dipping the tool in vertically. I cannot tell you if this makes any difference (or not) but that's the way I read it should be done and have therefore always done it that way. It seems to work, which is the most important test I guess. I temper all my tools.

                                  Regards,

                                  IanT

                                  Edited By IanT on 22/03/2020 13:46:25

                                  Ian what is the idea here of the copper wire is it just to hold the cutter? If it is to encase the cutter do you mean loosely like a birds nest so you can still see the cutters colour or completely wrap it?

                                  Chris

                                  #458932
                                  SillyOldDuffer
                                  Moderator
                                    @sillyoldduffer
                                    Posted by IanT on 22/03/2020 13:44:21:

                                    I use brine and 'swirl' it before dipping the tool in vertically. I cannot tell you if this makes any difference (or not) but that's the way I read it should be done

                                    It's done to stop steam forming an insulating layer between the hot metal and the cold water. Heat treated steel doesn't stay hard unless it's rapidly cooled.

                                    Hard to imagine steam being a good insulator but at red-heat it is! Stirring the water breaks the steam layer up and allows liquid to reach the metal for quick cooling. And moving water cools even faster than still water.

                                    Dave

                                    #458975
                                    IanT
                                    Participant
                                      @iant

                                      Yes, Dave has the basic reasoning behind it Chris – but it is also a simple way to hold (& then dunk) the tool. You don't really want to pick the red-hot part up with (cold) pliers – as it will start to cool before you actually dip it..

                                      Regards,

                                      IanT

                                      PS – it's wrapped fairly tightly…not loose

                                      Edited By IanT on 22/03/2020 20:39:36

                                    Viewing 17 posts - 1 through 17 (of 17 total)
                                    • Please log in to reply to this topic. Registering is free and easy using the links on the menu at the top of this page.

                                    Advert

                                    Latest Replies

                                    Home Forums Beginners questions Topics

                                    Viewing 25 topics - 1 through 25 (of 25 total)
                                    Viewing 25 topics - 1 through 25 (of 25 total)

                                    View full reply list.

                                    Advert

                                    Newsletter Sign-up