Rob Roy – Order of removal the boiler from the frames

Rob Roy – Order of removal the boiler from the frames

Home › Forums › Help and Assistance! (Offered or Wanted) › Rob Roy – Order of removal the boiler from the frames

Viewing 12 posts - 1 through 12 (of 12 total)
  • Author
    Posts
  • #866278
    Greensands
    Participant
      @greensands

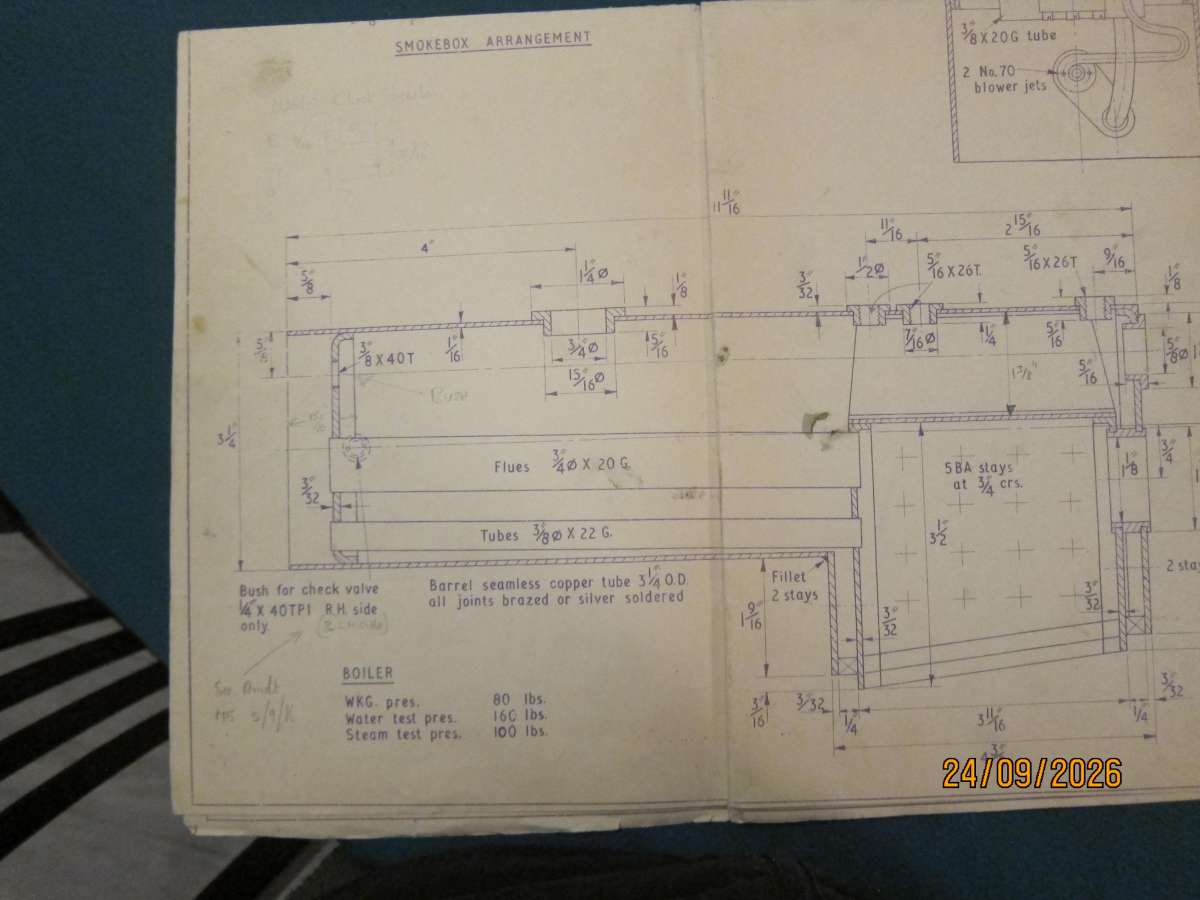
      Hi – I have just carried out a hydraulic boiler test on my Rob Roy 3.5”G locomotive and to my chagrin have discovered a small leak inside the smokebox from one of the boiler tubes which unless anyone can suggest otherwise indicates some major surgery is required and the removal of the boiler from the chassis. Can anyone suggest the general procedure for the removal of the boiler from a Rob Roy as it has been years since the build was completed and I have totally forgotten the order of assembly?

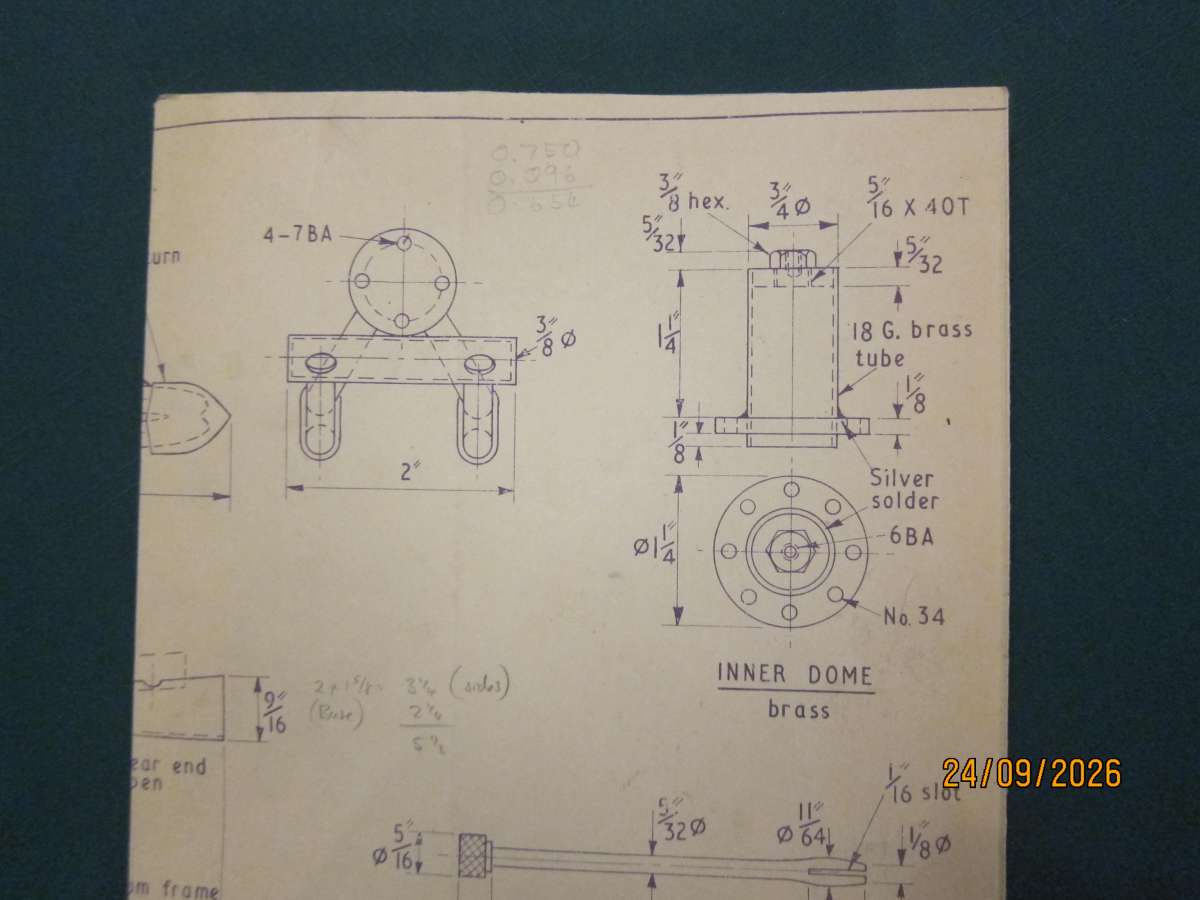
      Another source of leak was found to be around the dome cover and its bush. The dome is held down by 8, 6BA PB Hex somewhat short 6BA PB screws tapped into blind holes, the thread of one of these now stripped.  What I would like to do is to re-drill out and tap all 8 holes in the bush and replace them with stainless steel hex headed bolts drilled and tapped all the way though to the inside of the boiler to maximise the thread engagement.

      Am I right in saying that it would be perfectly acceptable to drill and tap the dome bush right through to the inside of the boiler in order to get a longer length of screw engagement given that something like Red Hylomar should take care of any steam leakage up passed the threads ?


      #866316
      Nigel Graham 2
      Participant
        @nigelgraham2

        I see no reason not to have the screws or studs in through-holes. Having just done a very similar repair on my loco’s steam outlet!

        Studs and nuts are preferable because if you do need remove the fitting you can leave the more delicate threads in the boiler bush well alone.

        If possible, don’t use studding. Make proper studs, so the boiler end screws down to the thread run-out, helping seal it. A slight reduction turned along the shank diameter will ease assembly and any subsequent removal / re-assembly.

        Your problem here though is material. Most likely you will need replace the 6BA with a metric size, needing careful study of the thread tables to determine the best size. M3.5 might be nearest without undue diametral conflict. M4 may bring nuts too large for the dome flange, and the increase in diameter reduces the sealing area.


        Regarding boiler removal, Haynes don’t seem to publish a manual for miniature railway locos (“Re-assembly is the reverse of dismantling…” ). So really, all you can do is examine the engine carefully and work out a logical order.

        Have ready suitable containers for the fasteners and parts; label them. Where possible use 1/4″-drive socket-spanners or nut-drivers as these will reduce the inevitable damage to paintwork that covers fasteners.


        I don’t know the Rob Roy but I would think for any locomotive:

        1) Superstructure (cab and tanks) first. Cab floor. Grate and ashpan (usually a single unit designed to be dropped easily from the firebox… and awkward to replace.) Ensure you’ve suitably disconnected fittings screwed to the cab sheets, and piped to the boiler.

        2) Pipes at their boiler connections, beyond those already disconnected when removing the upper works. A tip: released union nuts delight in wriggling down their pipes to lodge in obscure corners. A bit of masking-tape or string round the pipe will keep the nut near the union. I’ve also lent my own engine’s plumbing those miniature “clothes-pegs” normally used for clipping Christmas-cards to strings.*

        3) Dome cover… Already off. Dome as well, you tell us.

        4) Cladding – if it will come off easily at this stage. It might be easier left until the boiler is off the frames.


        5) Smokebox. This is likely the trickiest stage because designers of scale-model engines seem to think we have scale hands too. Carefully examine the entire front end to determine what has to be disconnected and what can be left. Remove the door so it doesn’t get in the way. Slip the cross-bar back onto the dart to store it with the door.

        Obviously the main steam pipe to the cylinders.

        Also the pipe from hollow-stay (usually) to blower-ring. If possible disconnect the blower end but only slacken the stay union, as that is likely the less accessible.  If your loco has a vacuum-brake ejector you’ll probably have disconnected it when dismantling the cab.


        6) Boiler mounting. Examine how the boiler is mounted in the smokebox and on its expansion-brackets at the sides of the firebox.

        Any screws or bolts at the front end, engaging the barrel forwards of the tube-plate, that will need removing?

        The expansion-brackets will almost certainly have, or be, retainers which when removed allow you to slide the boiler backwards and lift it clear. They may be simple angles that hold lugs on the firebox, onto the frame tops.

        NB: a) If possible place a wooden batten across the frame tops just aft of the smokebox, of sufficient height that the disengaged boiler can’t accidentally nose-dive into the chassis. b) Ensure you’ve not missed some obscure pipe or other fitting.


        In general:

        Don’t dismantle more than necessary; but don’t leave in place fittings that will unduly obstruct the main work.

        If items like the pressure-gauge and whistle are screwed to the sheet-work, leave them there. Slacken their unions but disconnect their pipes at the manifold.

        Large, painted units like the cab and tanks may be stored (dry) wrapped in bubble-wrap and suitable boxes.


        =====

        *Re-fitting my club’s loco, I soft-soldered thin pipe slices to discreet spots on a couple of pipes as permanent union-nut restrainers.

        #866383
        duncan webster 1
        Participant
          @duncanwebster1

          Depending on the total thickness of the item it might be possible to just drill through 6ba tapping and continue the 6ba thread right through. You don’t need all that much thread length to develop full strength, just think how thick a nut is.

          If you do have to go up a size, then think about having studs with 6ba one end and larger where it screws into the boiler, then you don’t need bigger nuts.

          For you front end leak if it is tube to tube plate then talk with your boiler inspector about sealing it with Comsol. Much less likely to cause other leaks.

          #866393
          noel shelley
          Participant
            @noelshelley55608

            As Duncan has said you only need a short bolt for strength – 1.5 times thread dia. Take a 6 BA plug tap, grind the end flat to get full thread depth and run it to the bottom of the hole and see how much you have. Whilst a through hole should seal, better if it’s blind. Noel.

            #866405
            Greensands
            Participant
              @greensands

              Many thanks for the very useful information being provided and exactly the help I am looking for. Close inspection of the drawing for the dome bush reveals that drilling through into the steam space would involve drilling through the boiler shell as well as the bush, something I think from what has been said should be avoided.  Much food for thought.

              #866419
              Nigel Graham 2
              Participant
                @nigelgraham2

                What should be avoided is a tapped hole in only the boiler shell. In this case the shell at that point is more than amply reinforced by the dome bush unless the holes are interrupted by the flange overhanging the shell.

                It isn’t ideal as the screw provides a potential leak path, hence using a stud with full diameter or better slightly over-size at its run-out, to act a bit like a screw-down valve. Put non-setting jointing compound on the thread.


                I’ve just completed a similar repair on my loco’s superheater wet header, using dual-diameter studs as Duncann suggests, with a little collar formed by stopping the reduced diameter just short of that larger thread. I’m now preparing it for a preliminary hydraulic test (no point submitting it for the formal one until it’s passed my own test to othe same procedure).

                #866424
                Greensands
                Participant
                  @greensands

                  I rather fancy trying the 5BA/6BA stud approach as it avoids making any changes to either the dome flange or the boiler bush but in the past I have found the making and fitting of studs using the double nut method of screwing into place a tricky affair. The nominal length of the stud would be 1/8” (5BA section)+1/4”(6BA section) +1/16” extra = 13/16” to be cut from PB of GM. Any advice on making and fitting of studs would be much appreciated.

                  RobRoy Dome Fittings (2)RobRoy Dome Fittings (1)

                  #866431
                  Greensands
                  Participant
                    @greensands

                    Correction – For 13/16″ read 7/16″

                    #866432
                    duncan webster 1
                    Participant
                      @duncanwebster1

                      Having seem the drawings I’ve spotted something to look out for. If the stripped thread is along the boiler centre line and you drill through you might create a leak between the shell and the underside of the dome bush unless you are certain there is a blob of silver solder sealing it off. Hopefully it is away from the CL, in which case leave the ones on the CL alone, screw in a bottoming tap and use studs, then you know you’ve go full engagement. If it is on the CL, then I’d flood the area with Comsol before drilling through, but discuss it with your boiler inspector, some are a bit sniffy about using anything other than silver solder even for a non strength joint.

                      Another issue I’ve just noticed, the diameter of the bush where it fits in the boiler is 15/16″, and the holes appear to be on 1″ PCD (although this isn’t shown on drawing). This means that it’s only 1/32″ from the edge of the bush to the centre of the hole  as it breaks through, which might cause trouble

                      #866460
                      Greensands
                      Participant
                        @greensands

                        A query I have when using Red Hylomar as the gasketing material between two mating flange surfaces (e.g. a  Wet Header assembly) is having made the joint, should one go back and have ‘one more round of  tightening? Recent experience is that you can do this too often with the result that the Hylomar is simply squeezed out from the joint leaving precious little between the mating surfaces.

                        Where am I going wrong and is there a more suitable alternative to Red Hylomar for this sort of work?

                        #866468
                        noel shelley
                        Participant
                          @noelshelley55608

                          Rocol Steam Seal ? Available at good engineering suppliers. Noel.

                          #866481
                          duncan webster 1
                          Participant
                            @duncanwebster1

                            Tapping size for 5ba is smaller than the OD of 6ba, so you cannot get full 5ba thread in a hole that has previously been 6ba. It will be close, probably good enough, but I’d have a practice on a bit of scrap first

                          Viewing 12 posts - 1 through 12 (of 12 total)
                          • Please log in to reply to this topic. Registering is free and easy using the links on the menu at the top of this page.

                          Latest Replies

                          Viewing 25 topics - 1 through 25 (of 25 total)
                          Viewing 25 topics - 1 through 25 (of 25 total)

                          View full reply list.