How do you pin a crankshaft joint?

Advert

How do you pin a crankshaft joint?

Home Forums Beginners questions How do you pin a crankshaft joint?

Viewing 25 posts - 1 through 25 (of 25 total)
  • Author
    Posts
  • #286217
    Gareth Jones 9
    Participant
      @garethjones9

      Hi Forum, I'm new to model engineering. I've been looking through the work in progress sections and note in a couple of builds that crankshaft joints have been assembled with loctite and pinned through the joints with silver steel. How is this done?

      Advert
      #8583
      Gareth Jones 9
      Participant
        @garethjones9
        #286231
        Nick_G
        Participant
          @nick_g

          .

          Firstly you need the correct grade of loctite. 638 is best. Secondly the areas to be joined need to have a less than perfect finish on them. I used a knackered tip on purpose when boring the webs so that it had a rough surface. I will also put the shaft back into the lathe and score the areas that will coincide with the webs. You also need a couple of thou between the parts so that when pressed together the process does not wipe the loctite off. Some needs to be actually in the joint. Also very important is that the parts need to be totally clean from oil. – 638 works quickly. You have to get it right 1st time and pronto.!

          I was actually discussing this only last night with Michael Gilligan. And there is an argument that if done properly the pin is not needed.! i.e. that if any force is placed onto the pin it means the main bond is already 'fubar'

          I am actually about to do this process on a reasonably large (by my standards) crankshaft. The purists will be horrified. wink – But I will also pin it with 5-6mm silver steel for peace of mind.

          As to the actual process. I don't know how much of a rush you are in doing this but I will be photographing it when I do.

          Nick


          Edited By Nick_G on 27/02/2017 11:19:38

          #286241
          JasonB
          Moderator
            @jasonb

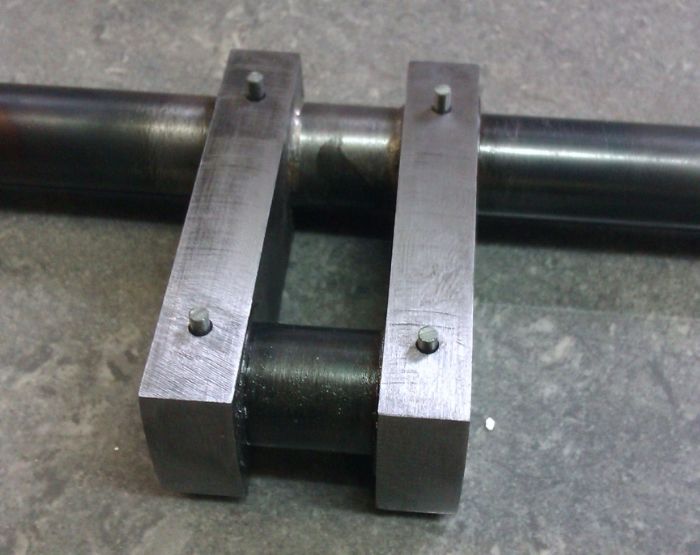
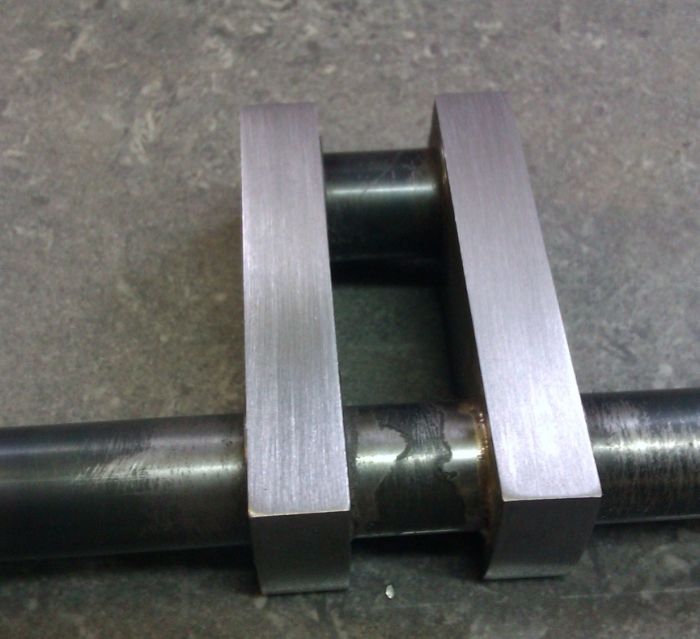
            After joining the actual shafts to the webs with either A Loctite type product or silver solder ( I prefer silver solder on teh larger cranks) this is how I pin the joints.

            Drill cross holes through the assembled parts and lightly countersink.

            Cut a length of your pin material a little overlength,( I just use mild steel rather than silver steel) place pins in hole with equal sticking out each end, they can be fitted dry or have some of the Loctite added

            Support one end of your pin material on some form of anvil, this can just be a big bit of bar in your vice, then pein over the ends of the pin much like you would a rivit

            When the Csk is filled file off the excess and you should not be able to see the pin.

            Edited By JasonB on 27/02/2017 11:52:35

            Edited By JasonB on 27/02/2017 12:05:54

            #286245
            Gordon W
            Participant
              @gordonw

              Would it be better to fit the pins before silver soldering , then solder everthing up together? Can't help but think the joint would be stronger, but have nothing to prove it.

              #286248
              Gareth Jones 9
              Participant
                @garethjones9

                Thanks Gents. So how deep would you drill the cross holes? All the way through, or just half perhaps?

                #286250
                JasonB
                Moderator
                  @jasonb

                  All the way through.

                  #286252
                  Anonymous

                    When I made the crankshaft for my Economy hit 'n' miss engine I loctited the joints and then pinned. I can't remember what size pins, but around 4-5mm. I drilled all the way through and loctited the pins in place. I did not countersink the pins holes. Leaving the pins overlength and then draw filing results in the pins being near invisible.

                    I didn't do any special roughing of the joints before assembly; it's not needed. The recommended surface roughness for loctite joints is around 1.6µm to 3.2µm Ra. That's the sort of surface finish that I normally achieve when turning.

                    Andrew

                    #286279
                    Michael Gilligan
                    Participant
                      @michaelgilligan61133

                      Opinions will vary [widely] … and, of course, that's why we have a forum.

                      Personally, I have great faith in Loctite 638

                      Its 'Compressive Shear Strength' is, I would suggest, adequate for most 'model' crankshafts.

                      … The numbers are in the Technical DataSheets, and the test is prescribed in ISO 10123

                      MichaelG.

                      .

                      P.S. There is an on-line copy of the equivalent ASTM Standard available at:

                      ftp://185.72.26.245/Astm/2/01/Section%2015/ASTM1506/PDF/D4562.pdf

                      < I shall now leave you to it >

                      Edited By Michael Gilligan on 27/02/2017 14:21:30

                      #286284
                      MW
                      Participant
                        @mw27036

                        I personally think a rivet/pin will give one of the strongest joints possible.

                        Michael W

                        Edited By Michael-w on 27/02/2017 14:34:47

                        #286290
                        Roderick Jenkins
                        Participant
                          @roderickjenkins93242

                          My Wyvern is Loctited only. Precision ground mild steel in reamed holes. Hasn't come apart yet but adding a pin doesn't hurt.

                          Rod

                          Edited By Roderick Jenkins on 27/02/2017 15:15:42

                          #286298
                          Chris Gunn
                          Participant
                            @chrisgunn36534

                            Gareth, if you follow Jason's method above you will not go far wrong, I personally would silver solder a joint or weld it as well as pinning the joints if the engine was to do serious work using steam, especially if the crankshaft is sitting above a nice hot boiler as in a traction engine. If the engine finishes up running occasionally on air for demonstration I might consider Loctite plus pinning. Belt and braces in a key component is always a good idea.

                            Chris Gunn

                            #286305
                            Neil Wyatt
                            Moderator
                              @neilwyatt

                              > You also need a couple of thou between the parts so that when pressed together the process does not wipe the loctite off. Some needs to be actually in the joint

                              Old wives tale!

                              Best joint is not too fine a surface finish and a close fit, a press fit it ok, but a close push fit is best.

                              I posted links to the databooks recently.

                              Neil

                              #286310
                              steve de24
                              Participant
                                @stevede2433577

                                Jason, very neat work – a technique worth remembering – thanks for sharing. Steve

                                #286348
                                Anonymous
                                  Posted by Neil Wyatt on 27/02/2017 15:57:12:

                                  Best joint is not too fine a surface finish and a close fit, a press fit it ok, but a close push fit is best.

                                  Must be reading a different Henkel application note to me. crook The advice given is that retaining compound can add some extra strength (~20%) to an interference (shrink) fit by filling microscopic gaps. If you don't need an interference fit then a gap of 1 to 3 thou is best, with Ra values as above.

                                  From an engineering perspective the use of a small gap is good as it is easier, faster and cheaper to produce.

                                  Andrew

                                  #286361
                                  Nigel McBurney 1
                                  Participant
                                    @nigelmcburney1

                                    the use of taper pins makes a better joint, if parallel pins are used then the holes should reamed a tight fit for silver steel pins, or ground dowel pins.

                                    #286362
                                    Neil Wyatt
                                    Moderator
                                      @neilwyatt
                                      Posted by Andrew Johnston on 27/02/2017 19:26:32:

                                      Posted by Neil Wyatt on 27/02/2017 15:57:12:

                                      Best joint is not too fine a surface finish and a close fit, a press fit it ok, but a close push fit is best.

                                      Must be reading a different Henkel application note to me. crook The advice given is that retaining compound can add some extra strength (~20%) to an interference (shrink) fit by filling microscopic gaps. If you don't need an interference fit then a gap of 1 to 3 thou is best, with Ra values as above.

                                      From an engineering perspective the use of a small gap is good as it is easier, faster and cheaper to produce.

                                      I'm sure we're looking at the same thing! Looking at the graph, the greatest strength is a 0.025mm (a push fit) and fits of less than 0.025 0.00 are all marginally better than 0.075mm. OK 2 thou is perfectly OK for strength BUT (1) you don't need to worry about a close fit wiping the adhesive out of the joint and it follows that (2) making the joint close enough to ensure accurate alignment is more important than allowing space for the adhesive.

                                      #286365
                                      MW
                                      Participant
                                        @mw27036
                                        Posted by JasonB on 27/02/2017 11:49:04:

                                        Support one end of your pin material on some form of anvil, this can just be a big bit of bar in your vice, then pein over the ends of the pin much like you would a rivit

                                        Is that a granite marking out table I see? Such wanton luxury, JasonB! cheeky

                                        #286367
                                        vintagengineer
                                        Participant
                                          @vintagengineer

                                          I have rebuilt a number of Edwardian aero engines with built up cranks. All these had the crankpins pinned but the pins always down the side of the pin, rather than through the centre. One other point is the crankpins on aero engines are always hollow.

                                          #286374
                                          Michael Gilligan
                                          Participant
                                            @michaelgilligan61133
                                            Posted by Neil Wyatt on 27/02/2017 20:49:13:
                                            .
                                            … making the joint close enough to ensure accurate alignment is more important than allowing space for the adhesive.

                                            .

                                            [raising my head briefly above the parapet]

                                            … We 'old wives', and many Production Engineers, tend to favour the use of something approximating splines [not unlike the very popular style of woodworking dowels] to both achieve alignment and provide a thou' or two of space for the product.

                                            MichaelG.

                                            .

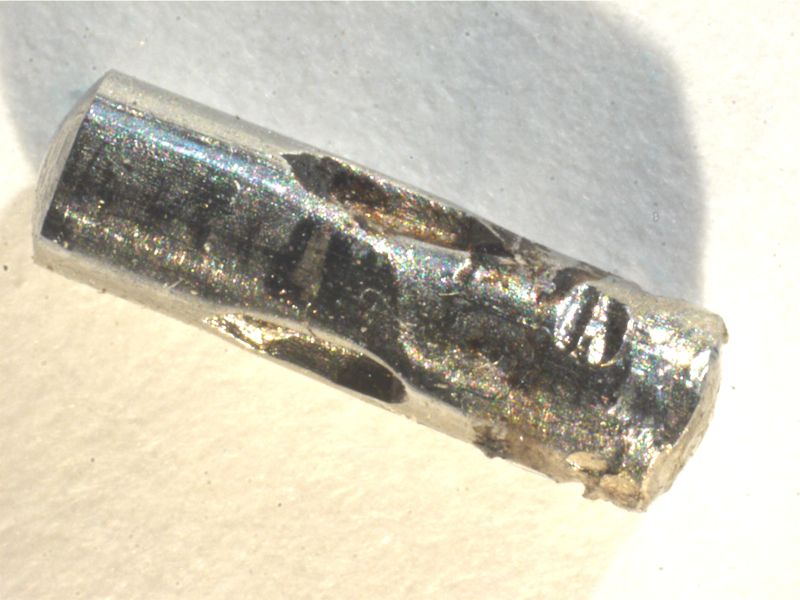
                                            2mm_pin.jpg

                                            .

                                            This is a little 2mm diameter cross-pin, from the shaft of a hand-held food blender … ignore the scars from the end-cutters, which were used to extract it [after heating to break-down the adhesive]; but note the use of three little 'upsets' to make it a light press-fit in the hole, whilst leaving a sufficient gap for the 'retainer' compound [probably Loctite 638, or similar].


                                            Edited By Michael Gilligan on 27/02/2017 22:00:36

                                            #286380
                                            julian atkins
                                            Participant
                                              @julianatkins58923

                                              The 'cotton reel' method can be used with advantage when using loctite for these assemblies.

                                              The problem with Neil's method is that the loctite sets too quickly, especially when doing a double crank axle as is often the case in miniature loco work with 2 inside cylinders, or quartering wheels in a jig.

                                              A single crank is very easy by comparison on a single cylinder model.

                                              We dont know what Gareth's proposed example is.

                                              JasonB's method is the way I have always done these bits on miniature locos with loctite.

                                              Cheers,

                                              Julian

                                              #286386
                                              Brian H
                                              Participant
                                                @brianh50089

                                                Having once having Loctited a Boxhill crank and the parts moving out of position slightly, I can vouch for the strength of Loctite as the parts had to be heated to a dull red before they reluctantly came apart.

                                                Brian

                                                #286387
                                                Neil Wyatt
                                                Moderator
                                                  @neilwyatt
                                                  Posted by julian atkins on 27/02/2017 23:03:59:

                                                  The problem with Neil's method is that the loctite sets too quickly, especially when doing a double crank axle as is often the case in miniature loco work with 2 inside cylinders, or quartering wheels in a jig.

                                                  It depends which 'Loctite' you use, the retainers generally have quite generous working times, if you use a 'superglue' then you will have problems.

                                                  The high temperature 620 has a setup time of 60 minutes which probably makes it the ideal retainer for our steam engine crankshafts.

                                                  641 and 660 have setup times of 20 minutes. 232 for heavy press fits and 640 for long assembly time also give you an hour.

                                                  Neil

                                                  #286388
                                                  JasonB
                                                  Moderator
                                                    @jasonb
                                                    Posted by Michael-w on 27/02/2017 21:01:39:

                                                    Is that a granite marking out table I see? Such wanton luxury, JasonB! cheeky

                                                    No such luxury, it's a 300 x 600 Porcelain tile. Does the job as my marking out surface. If the models all run why invest in anything fanciersmiley

                                                    #286408
                                                    vintagengineer
                                                    Participant
                                                      @vintagengineer

                                                      Straight knurling gives a good interference fit.

                                                    Viewing 25 posts - 1 through 25 (of 25 total)
                                                    • Please log in to reply to this topic. Registering is free and easy using the links on the menu at the top of this page.

                                                    Advert

                                                    Latest Replies

                                                    Home Forums Beginners questions Topics

                                                    Viewing 25 topics - 1 through 25 (of 25 total)
                                                    Viewing 25 topics - 1 through 25 (of 25 total)

                                                    View full reply list.

                                                    Advert

                                                    Newsletter Sign-up