Drawing Projections

Advert

Drawing Projections

Home Forums Beginners questions Drawing Projections

Viewing 25 posts - 26 through 50 (of 167 total)
  • Author
    Posts
  • #98577
    jason udall
    Participant
      @jasonudall57142

      First Angle … Object inside the corner of a box with [let's say] cardboard walls

      Third Angle … Object inside the corner of a box with [let's say] tracing paper walls

      In photographic terms it would be the difference between using "Front-Projection" and "Back-Projection" screens.

      Does that help?

      MichaelG.

      Brilliant In 35 years never seen better explanation.

      Advert
      #98579
      blowlamp
      Participant
        @blowlamp

        Wolfie.

        To remind myself of the difference, for 1st angle projection, I think of a simple object lighlty covered in ink and laying on paper. When the paper is lifted so as to wrap the object, its shape is 'printed' to the paper.

        1st angle is also kind of like a clay mould of the submerged object, that has been peeled away to make it flat and the outlines of the shape enhanced.

        3rd angle projection is the actual image you see of the object features facing you. This image is then represented as being repositioned behind the object, in that particular viewing direction.

        It is quite hard to try and explain face 1

        Martin.

        #98580
        Gordon W
        Participant
          @gordonw

          I feel sorry for Wolfie, the explanations seem to be getting more and more complicated, and I'm an ex draffy. I 've said before the best way is to label all views, eg. "view on arrow A", "section on X-X" , etc. . Also don't believe the truncated cone symbol always, there are lots of drawings with views in the wrong place, always check.

          #98581
          Terryd
          Participant
            @terryd72465
            Posted by Sid Herbage on 16/09/2012 18:34:02:

            What do you make of this? on a drawing received (from the UK) a while ago.
            1st angle.jpg

            Hi Sid,

            it is an error, the symbol shows third angle.. To answer the question 'why not just use words?' The symbol is used to indicate type of projection (i.e. the placing of the various views) so that non Englsh speakers are clear which projection system is being used – the use of language allows the possibility of the sort of conflict that Sid's example demonstrates.

            Hi Jason U,

            I did say "imagine a tapered cork' which I think indicates a solid rather than a hollow object. I used that description as there are those who do not understand the geometrical term 'truncated cone'.

            As for there being no difference, both examples are of the same 'cork' but the layout of the views makes a great difference to the interpretation. Confusion can lead to misunderstandings of more complex shapes, as JA points out above it is important to know the type of projection used. I have seen examples in ME which actually use both types of projection on the same drawing and they had me confused until I realised that fact.

            Best regards

            Terry

            #98585
            Wolfie
            Participant
              @wolfie

              "First Angle … Object inside the corner of a box with [let's say] cardboard walls

              Third Angle … Object inside the corner of a box with [let's say] tracing paper walls"


              OK this 3rd angle I get, same as the glass box, simple. The face or side or top or whatever of the object is drawn as if you're looking down or at it.

              So whats the first angle. Is it different and if so why? And I ain't got a clue what those two circles are. If its a truncated cone, which way up is it?

              "To remind myself of the difference, for 1st angle projection, I think of a simple object lighlty covered in ink and laying on paper. When the paper is lifted so as to wrap the object, its shape is 'printed' to the paper."

              Is this not the same then as what youd see if you were looking at it, ie 3rd angle?


              Edited By Wolfie on 17/09/2012 11:42:50

              #98590
              Gray62
              Participant
                @gray62

                They say a picture paint a thousand words…

                So how about this:

                orthographic.jpg

                CB

                #98591
                Martin Kyte
                Participant
                  @martinkyte99762

                  OK my twopence worth as remembered from school. Draw the object face on. If you want 1st angle rotate the object 90 degrees about a point BEHIND it, draw what you see. If you want 3rd angle rotate 90 degrees about a point in front of it and draw what you see. Convention shows end elevation on the left for first angle and end elevation on the right for third angle. That way you allways get the right hand side and the top view. Nothing to stop you drawing all views though.

                  I still have to think about it.

                  #98592
                  Joseph Ramon
                  Participant
                    @josephramon28170

                    Coalburner's posting is the only one in this whole thread that says everything that needs to be said and nothing more

                    Joey.

                    #98595
                    David Clark 13
                    Participant
                      @davidclark13

                      Hi There

                      Having been working in the UK for an American company we had both first and third angle projection drawings.

                      If we could not figure out what was what, we found a drawing that could not be misinterpreted and used that as a guide to the confusing one.

                      regards David

                      #98596
                      jason udall
                      Participant
                        @jasonudall57142

                        In short Wolfie you are not alone.

                        Another "symbol" oftern appearing on drawings..."IF IN DOUBT ASK".

                        #98597
                        Terryd
                        Participant
                          @terryd72465
                          Posted by Wolfie on 17/09/2012 11:41:28:

                          …………………………...

                          So whats the first angle. Is it different and if so why? And I ain't got a clue what those two circles are. If its a truncated cone, which way up is it?

                          …………………………..

                          Edited By Wolfie on 17/09/2012 11:42:50

                          Hi Wolfie ,

                          as it was my original posting that confused you let me try to clarify and hope not to cause you more confusion.

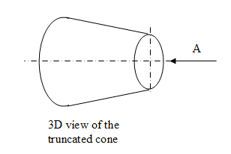
                          The symbol for third and first angle represents a a truncated cone lying with it's main axis horizontal as in the sketch below. I put this 3D sketch in simply to try to show the solid shape. Note I have now added centre lines and an arrow.

                          truncated cone.jpg


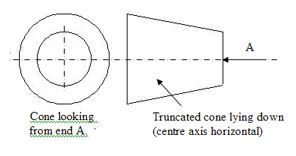
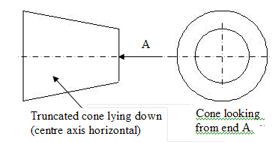
                          The symbol used on engineering drawings is a representation of that cone in a side and end view.   The trapezoid would be the side view of the cone and the circles, the end view.  Try to imagine that you are looking at a real cone from direction A. the circles are what you would see.  

                          The small circle in the end view is the small end of the cone and the large circle is the larger end (or base) of the cone. It's a bit like looking down on a volcano (with a filled crater).  It is the position of those views which represent the 'angle' (first or third) of the drawing.

                          First Angle symbol is:

                          first angle symbol.jpg

                          Third angle is:-

                          third angle symbol.jpg

                          They are of exactly the same cone and the views are the also the same. It is the positioning of those views which makes the difference and it is  that layout of the views on the drawing can make a huge difference as to how you interpret them, as others have reported.

                          I really hope that helps, use it with Coalburners example above to see if it does.

                          Regards

                          Terry

                          Edited By Terryd on 17/09/2012 13:32:51

                          #98599
                          blowlamp
                          Participant
                            @blowlamp

                            Wolfie.

                            Forget my contribution… it's a load of old crap blush

                            Here's a link that I hope may make help in this topic.

                            Martin.

                            #98601
                            Gray62
                            Participant
                              @gray62

                              Blowlamp. that is a great example of 1st angle orthographic projection, – if you coud post the same for 3rd angle I think, with the example image I posted we could put this thread to bed laugh.

                              cheers

                              CB

                              P.S Once resolved, maybe we could make this thread a 'sticky' – Not sure if this crappy forum SW has that ability sad

                              CB

                              #98603
                              Wolfie
                              Participant
                                @wolfie

                                But in Coalburners drawing the two are the same, front face, end face, top face. Whats the difference?

                                Okayy so its where the cone is that makes it different. The drawings are the same?

                                #98604
                                Gone Away
                                Participant
                                  @goneaway
                                  Posted by John Stevenson on 17/09/2012 08:13:52:

                                  Not knocking Wolfie but it's obvious from his posts that he's just starting out in this game and the original question was a valid one in his search to become one of the experienced ones.

                                  Yes of course – but I was clearly responding to Dave M 's post.

                                  #98605
                                  Wolfie
                                  Participant
                                    @wolfie

                                    I just looked at Blowlamps link. I think my problem is that I don't understand the difference between 1st and 3rd, they look the same to me

                                    #98608
                                    Keith Long
                                    Participant
                                      @keithlong89920

                                      Hi Wolfie

                                      I think you might be better off popping along to your local library and borrowing a book on engineering drawing – they should have some that are used for the GCSE syllabus.

                                      The difference between 1st and 3rd angle projection is the relative positions of the views on the page as you see them. The other difficulty is that the examples shown have been very simple shapes and so the views in 1st and 3rd ARE the same, just arranged differently on the page. Slightly more complicated shapes may show the differences more clearly. Also the descriptions of how you arrive at the views are getting very confusing to me – and I've been reading drawings for 40 years and had draughting training!

                                      Have a look for an introductory text book and have a good read. Try some simple drawing exercises for yourself and see how you get on, and then come back with more questions.

                                      Take heart it can be confusing to start with, buit with a bit of thinking around the issues it should become clearer and then it's just a case of reading more drawings and making tools models.

                                      You've mastered your lathe and mill – just another skill to pick up o9n the way.

                                      Good luck

                                      Keith

                                      #98610
                                      David Clark 13
                                      Participant
                                        @davidclark13

                                        Hi There

                                        I have stuck it.

                                        regards David

                                        #98613
                                        blowlamp
                                        Participant
                                          @blowlamp
                                          Posted by CoalBurner on 17/09/2012 14:23:23:

                                          Blowlamp. that is a great example of 1st angle orthographic projection, – if you coud post the same for 3rd angle I think, with the example image I posted we could put this thread to bed laugh.

                                          cheers

                                          CB

                                          P.S Once resolved, maybe we could make this thread a 'sticky' – Not sure if this crappy forum SW has that ability sad

                                          CB

                                          In an effort to redeem myself, here's a link to the 3rd angle projection tutorial from the same site.

                                          There's some other good stuff at the link which explains things in a way that I like.

                                          Am I right in thinking that a good indicator of a 1st angle projection drawing is when the Plan view appears below the Front and Side views?


                                          Martin.

                                          Edited By blowlamp on 17/09/2012 15:18:07

                                          Edited By blowlamp on 17/09/2012 15:31:07

                                          #98628
                                          Michael Gilligan
                                          Participant
                                            @michaelgilligan61133
                                            Posted by Wolfie on 17/09/2012 14:24:26:

                                            But in Coalburners drawing the two are the same, front face, end face, top face. Whats the difference?

                                            Okayy so its where the cone is that makes it different. The drawings are the same?

                                            Wolfie,

                                            I see that you are still struggling with this, so please allow me one more try:

                                            In the diagram; the "side view" is the stable point of reference … it's the position of the two concentric circles that varies. [ Yes, I know that sounds pedandtic, but it's important to understanding the diagram.]

                                            The "object" is a solid truncated cone and is therefore radially symmetrical … it is a solid of rotation, just like you would turn in the lathe. Any "side view" is therefore identical, so the trapezoid shape is infinitely ambiguous. [we neither know, nor care, if it is side, top, or bottom]

                                            The end view [regardless of which projection we use], is two concentric circles both drawn in "solid line". We MUST therefore be looking at the small end of the object.

                                            The only thing that remains is the location of that end view … and that is the crucial piece of information that is provided the diagram. It defines the format for all views in the drawing.

                                            MichaelG.

                                            #98630
                                            Wolfie
                                            Participant
                                              @wolfie

                                              OK so the position of the two concentric circles in relation to the trapezoid tells us where in the diagram the side view will be in relation to the front view??


                                              I can tell which is which already.

                                              Edited By Wolfie on 17/09/2012 19:51:24

                                              #98636
                                              Michael Gilligan
                                              Participant
                                                @michaelgilligan61133

                                                So what's the problem ?

                                                MichaelG.

                                                #98637
                                                Phil H 1
                                                Participant
                                                  @philh1

                                                  Wolfie,

                                                  Great to see you have soted it out. Now you just need to crack 2nd and 4th angle projection and you have the full set.

                                                  Phil H

                                                  #98656
                                                  Dave Morris 1
                                                  Participant
                                                    @davemorris1

                                                    Sorry guys, didn’t mean to cause any upset but if it helps someone to have a visualisation method to help them why not?

                                                    Third angle –up the bowl, Flemings left and right hand rule for motors or generators, rhymes for remembering trig or resistor colour codes etc.

                                                    If engineering is someone’s hobby he needs confidence in his own ability to question a poor drawing, after all material is expensive and hobbies are supposed to be fun!

                                                    Dave

                                                    just found this http://www.youtube.com/watch?v=_wDpN6Zi1hE&feature=related

                                                    Edited By Dave Morris 1 on 18/09/2012 01:57:41

                                                    #98670
                                                    jason udall
                                                    Participant
                                                      @jasonudall57142

                                                      At the end of the day 1st 3rd or something freerange doesn't matter..IS IT CLEAR does.

                                                      most of the drawings I meet at work from very professional companies could be drawn to no standard at all.. but "work". some "small conpany " drawings are beauliful and complete .

                                                      and some times ( my personal pet hate) we get sent a part and say 1000 of them please….

                                                      a drawing is often just a place to hang dimentions and if it fulfils this role all is well.

                                                      PEACE

                                                    Viewing 25 posts - 26 through 50 (of 167 total)
                                                    • Please log in to reply to this topic. Registering is free and easy using the links on the menu at the top of this page.

                                                    Advert

                                                    Latest Replies

                                                    Home Forums Beginners questions Topics

                                                    Viewing 25 topics - 1 through 25 (of 25 total)
                                                    Viewing 25 topics - 1 through 25 (of 25 total)

                                                    View full reply list.

                                                    Advert