Singer 660 A1 sewing machine

Advert

Singer 660 A1 sewing machine

Home Forums General Questions Singer 660 A1 sewing machine

Viewing 25 posts - 1 through 25 (of 26 total)
  • Author
    Posts
  • #22742
    OuBallie
    Participant
      @ouballie

      How do I undo the pulley nut?

      Advert
      #125805
      OuBallie
      Participant
        @ouballie

        Singer 660 A1 sewing machine powered by a 1/2hp Mitsubishi clutch motor slung under the table.
        I need to fit a smaller pulley to slow the beast down, but have no idea how to remove the pulley nut that has a square plastic 'pin' on it.
        The only way I can think of right now, is to stop the pulley rotating, but how?
        Anyone know what that blue 'pin' in the nut is please.
        Does it act like a locking piece ala lock nut?
        Photos in My Photos.
        Help needed please!
        Geoff – Treatment has floored me today, so brain refuses to co-operate.
        #125811
        Neil Greenaway
        Participant
          @neilgreenaway71611

          Could you get a vee belt of the correct cross section and wrap it fully round the pulley and sandwich the two "loose" ends over a flat bar – then pull the wrapped belt tight around the bar with a jubilee clip and use it as a wrench to hold the pulley – then use a spanner/socket on the nut – the nut may be a type of nyloc fitting I guess.

          Neil.

          #125812
          Robbo
          Participant
            @robbo

            If the pin is plastic it is most likely a form of nyloc locking.

            Can you see if the nut is right or left hand thread?

            What you need to hold the pulley is a form of the old oil filter wrench, a bar with a rubber tail which wraps round and is secured back to the bar Something like this is sold these days as a "Boa Constrictor" for holding almost anything.

            #125815
            Arthur Sixsmith
            Participant
              @arthursixsmith43623

              You need to put clutch brake on by pushing on the "heel" of the tredle and at the same time squeezing the belt together. The nylon is just a plug to lock the nut. We some times tap (belt) the spanner with copper hammer.

              #125824
              Malc
              Participant
                @malc

                Hi Geoff, you are right, the plastic pin is a rather crude means of locking the nut to the threads. You will need to "shock" the nut loose initially. I used to heel back hard on the treadle, this has the action of forcing the pulley drive disc hard onto the brake. Whilst holding the treadle heeled back , use a well fitting spanner and give it a sharp clout with a metal hammer (or what have you)! to release the nut. Hope this helps,

                Malc.

                #125873
                OuBallie
                Participant
                  @ouballie

                  It's done!

                  Thanks for all the suggestions.

                  Grand-daughter and Dad paid me a visit late evening yesterday.

                  As Dad is very practically minded, I pointed out my problem to him and let him mull it over while I tracked down the little darling who had disappeared.

                  She's 18months old, and getting into everything, so eyes in 360° mode when she's around.

                  Went back to see how Dad was doing, and he just said clamp the pulley using a set of grip pliers!

                  Booger is all I said to that, got said implement, clamped on one side of the pulley, pliers resting on the guard and he heaved,

                  Was expecting the whole caboodle to tip over, not knowing how tight the nut was, but very little force was needed to have the nut undo.

                  Relief or what was how I felt seeing that ratchet spanner move so easily, and he is a strapping bloke to boot.

                  Thanks for all the suggestions. We had tried locking the spindle via the clutch, but no matter how much force I applied it didn't hold, so obviously not enough, and that's when I noticed little darling had vanished, so left him to it whilst I went a searching. Found her with a pair of small pliers in her hand, so possible engineer in the making or just curiosity.

                  I then retired for the night, as I had to take SHMBO to catch her 0350h coach to Stansted for her jolly to family across the channel.

                  Replacement pulley a hunting now.

                  Thanks again for all the great ideas in locking the pulley down. Things to keep in mind for any future need.

                  Geoff – In recovery mode.


                  Edited By OuBallie on 01/08/2013 12:20:47

                  #197756
                  OuBallie
                  Participant
                    @ouballie

                    Yesterday.

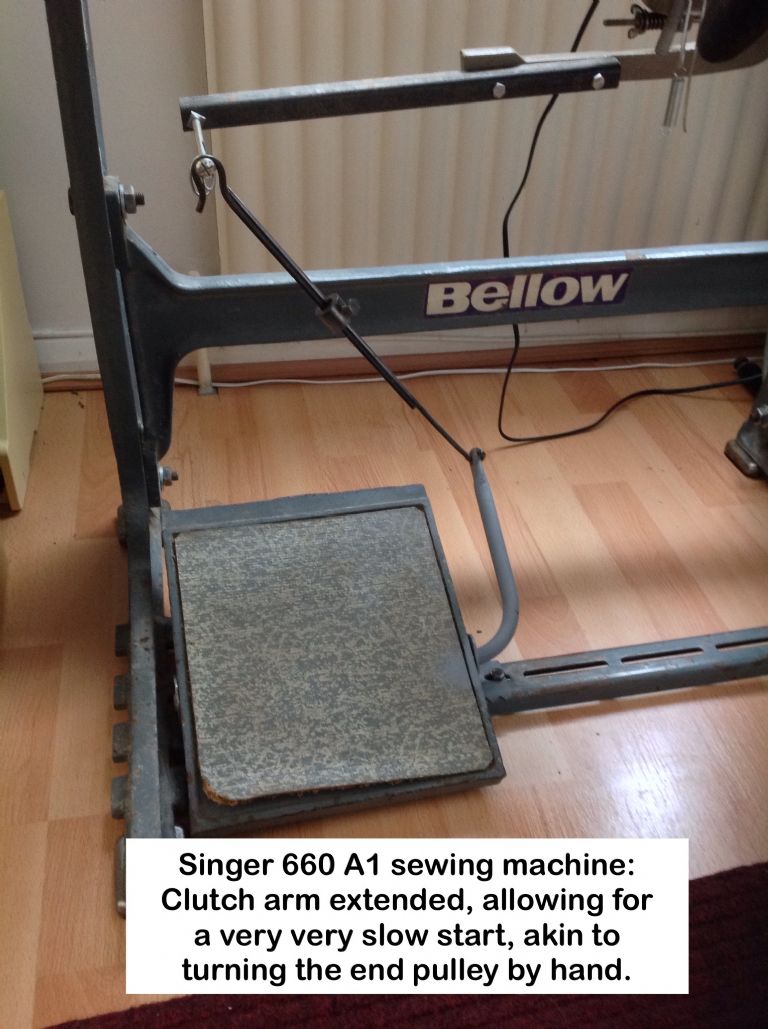
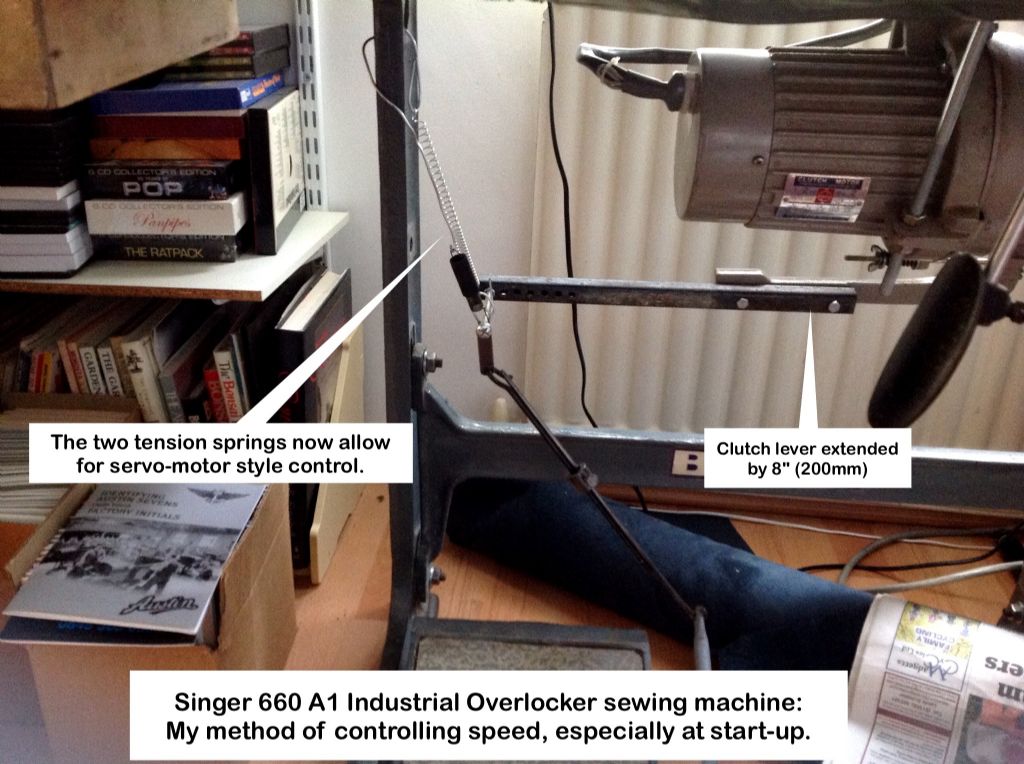
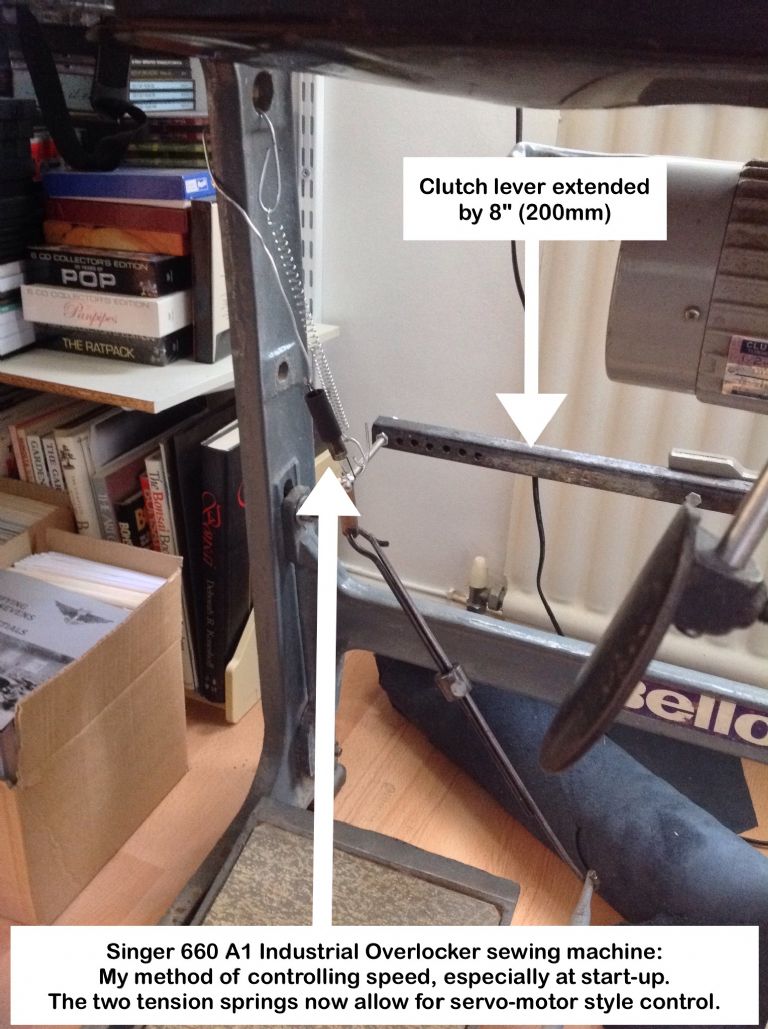
                    Time to try and tame the the start up of the machine, as it takes off as soon as the clutch bites, making it difficult to start sewing leather.

                    A servo motor would of course solve the problem, but that would be the absolute last solution.

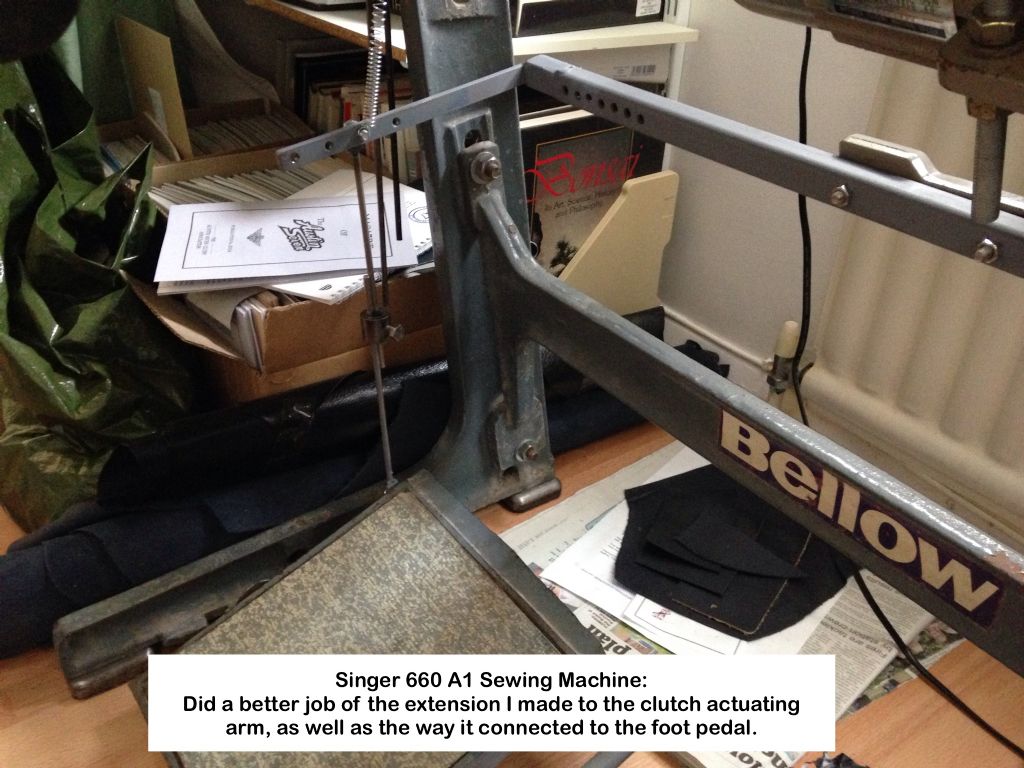
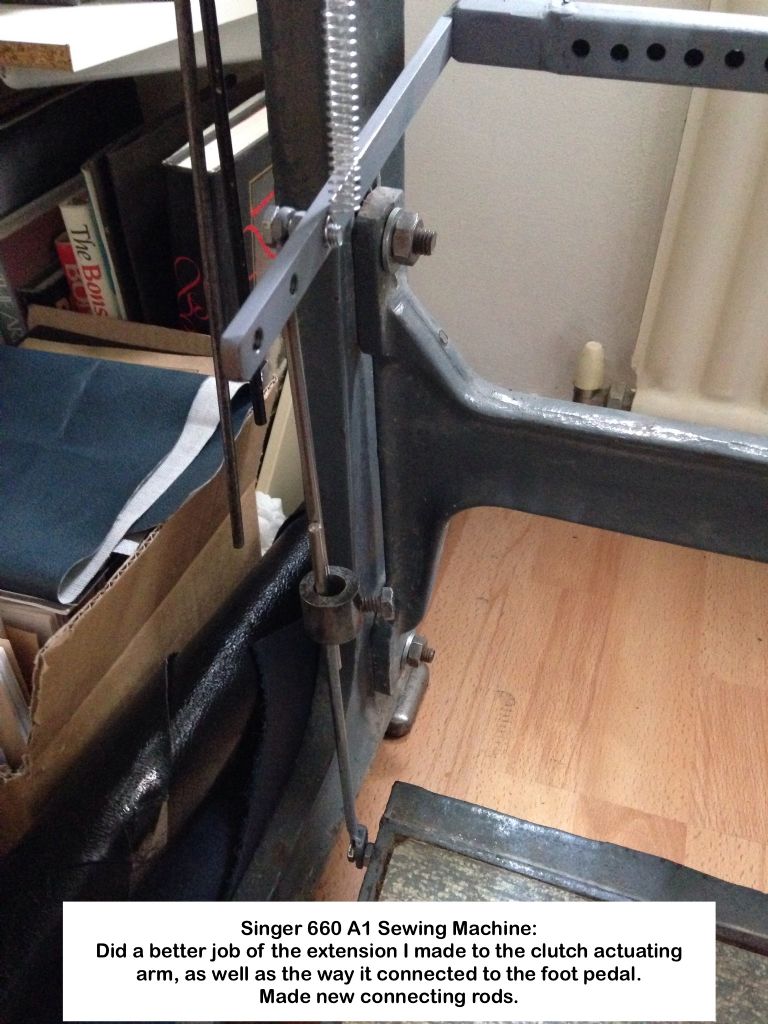
                    Leverage sprang to mind, so I grabbed a piece of 20mm sq tube, drilled three holes to lign up with those in the clutch arm, bolted it in place, and extending said arm by 8.1/2" (215mm).

                    Had to fit that long bolt to the end in order to get the two foot pedal rods to hook up.

                    The result had me whooping with joy as I can now get the machine to start at a crawl, thus making it much more pleasant to use.

                    Singer 660 A1

                    Geoff – This has to be my quickest mod ever surprise

                    #197789
                    Ian S C
                    Participant
                      @iansc

                      Good one Geoff, a very useful machine.

                      Ian S C

                      #197794
                      John McNamara
                      Participant
                        @johnmcnamara74883

                        Hi

                        Most Singer industrial sewing machines have the main pulley attached by set screws located in the V belt groove. If there is a plastic plug in the end of the shaft it is probably an oil retainer. There will be two screws one will have a point that locates in a drilled hole in the shaft. Occasionally there will be a cover screw on top of the screws, so if the pulley does not loosen when you untighten the screws check for the hidden screws. My advice is to leave it alone.

                        I don't understand why you would want to remove the pulley. We never had to do that. for speed control, in the furnishings factory I ran. You will need a clutch motor to control the speed. these are available quite cheaply if you don't have one. You use the pedal to control it. You will also need a knee lifter if the machine does not have one. this lifts the foot with a push from the right knee sideways.

                        These days you can also get servo controlled motors. for a plain sewing machine like yours not necessary.

                        You machine is capable of about 5000rpm on heavier materials a bit slower is needed or you may get thread breakages.

                        Get good needles for it Schmetz or Becka cheap needles are asking for trouble and breakages.

                        Most motors run at 2800rpm or 1425rpm if ever we wanted to tweak the top speed we just changed the motor pulley.

                        After an hour or so you will be able to control the clutch (it is designed to slip) push back on the pulley and you will get a dead stop as the brake comes in.

                        Extending the clutch lever will help while you are learning however once you are familiar you will find it is not needed, it creates a lot more work for your foot due to the excessive pedal travel.

                        If the motor has not been used for a while the clutch may be a bit sticky, Particularly if there is rust on the clutch faces. it normally wears off with use. You can speed the process by holding the hand wheel (Fingers clear of the belt) and applying a little power. Note protect your hand beware of the belt. 

                        I found a manual for it here….

                        **LINK**

                        Regards
                        John

                        Edited By John McNamara on 24/07/2015 13:47:27

                        #197811
                        OuBallie
                        Participant
                          @ouballie

                          Thanks Ian.

                          John,

                          I changed the 4" pulley for a 2" one some time ago, hoping it would make the machine perform a less 'violent' start, but to no avail.

                          The machine is equipped with both clutch motor and knee lifter, the last very useful.

                          The problem I had was that it would pick up speed far too quickly once the clutch bit.

                          Getting it to slow down was easy, but not to the speed I felt comfortable with and holding it there was very hit 'n miss, not something you want when sewing automotive leather. Lack of use.

                          I have no doubt your factory operatives handled the speed with aplomb, but me not.

                          Now that I know I'm on the right track, I will try the original pulley again, and get the top hook of the foot pedal hooked up properly.

                          Now that I'm able to commence sewing at crawling speed, I can build my confidence and experience, whereas beforehand the machine would just behave as if it was demented, with no hope of me controlling where or what was being stitched.

                          Oh I tried my utmost to get it to start slowly.

                          It's very easy to control at speeds that are far to high for my needs, but not at the slow ones I need, as the pedal didn't give me a sesitive enough feel, something I now have thank goodness.

                          Thanks for the advise on needles,

                          Any on thickness of thread to use please?

                          Manual I have thanks, and can now experiment with thread tension, now I have the machine behaving in a more civilised fashion

                          Need to source a supply of dark blue leather, then I'm set.

                          Geoff – Time to stop as I'm starting to ramble on me thinks.

                          #197838
                          John McNamara
                          Participant
                            @johnmcnamara74883

                            Hi Again

                            The size of the needle and thread size is determined by the material.

                            Leather can be thick, thin, hard or soft.

                            If the leather is soft you could try a Singer size 18 or 20 needle. Your machine can take up to a size 22 max
                            There are special cutting point needles for leather you may or may not need them. You can always try a standard sharp point one first, the blade points are harder to get and more expensive.

                            You may have to adjust the machine if it was previously used with fine needles. this requires moving the rotary hook to engage the scarf in the needle that allows the hook to pick up the thread off the needle. Unfortunately this risks getting the machine out of time. If you have not done it before a bit of a black art. It is described in the manual.

                            You will need to go to an industrial sewing machine supplier to source the right needles.

                            We used bonded nylon thread for heavier work its not expensive. Once you have selected your leather I would take a small sample to the supplier and ask for advice. buy a small supply of needles most will sell a pack of 10. maybe get two sizes.

                            I have no idea what you are making but if it is upholstery you will need piping feet if there is any piping to sew. Piping feet are normally sold left and right they come in different sizes for different diameters. (You may find feet in the draw)

                            **LINK**

                            On Needles

                            **LINK**

                            On sewing leather… Coats will advise you on the best thread for your work.

                            **LINK**

                            Regards
                            John

                            #197943
                            OuBallie
                            Participant
                              @ouballie

                              Thanks John.

                              You have given me the info I've been searching for, and best of all, from someone with experience.

                              The leather is for my 1935 Austin Seven Ruby, as only the rear seat is in leather, the rest in vinyl and non-standard.

                              Due to neglect, the leather had cracked, and felt and behaved more like cardboard it was so dry, but, applications of Gliptone cleaner first then conditioner every day for the last month is transforming it, as the potions did for my A35 front seats.

                              The leather I will be using will be for automotive use so not too thick, but, there will be a number of layers to sew together for pleats, edges and piping.

                              I obtained a selection of 'leather' needles from a specialist 40miles from me, so will now be able to try each in turn.

                              Piping feet I have, but only LH, but only time will tell if I need RH.

                              As for the adjustment you mention, I've studied the manual and it most certainly is black art and just makes the grey matter lock up solid so I will leave well alone whilst I experiment, having no idea what material the machine was used with before.

                              Thanks for the links.

                              Geoff – Fun and games ahead, with lots of Anglo-Saxon and no doubt toys out of pram moments to boot

                              Edit:

                              A walking foot machine would of course be ideal, but the Singer was at a give-away price so couldn't refuse.

                              Edited By OuBallie on 25/07/2015 11:54:05

                              #197983
                              John McNamara
                              Participant
                                @johnmcnamara74883

                                Hi

                                A few tips if you don't already know them.

                                When using a plain machine as opposed to a walking foot machine, The material drags on the foot which tends to hold back the top ply of the material while the teeth of the feed below push the bottom ply forward. This can be a real pain.

                                Just about any sewing shop will have silicone spray. This can be applied to the foot and the work to assist slipping. We never ever had a problem with staining. Try it on a scrap first.

                                Old timers would sometimes put tissue paper on top and sew through that to stop dragging, it can be torn away later. I Guess raiding the kitchen will reveal baking tissue, some is even non stick coated.

                                The pressure on the foot is adjustable it only needs to be high enough to maintain a regular feed and stitch length with good control. The higher it is the more sticking.

                                Piping cord… I guess you are trying to match the original. These days not that easy to find. The stuff that is sold at dressmakers shops is usually soft cotton twist. it makes your work harder, The ideal piping is quite firm, this forms a nice round that will feed through the piping foot with more control. Venetian blind cord is available in different sizes, you can also get fine nylon cord from some ships chandlers.my guess is you will be looking for around 2mm diameter. a smooth outer surface is ideal. Upholsters suppliers will also have what you need if there is one near.

                                Have you noticed that the back flat part of piping is "Nicked" to allow it to go round corners?

                                We often sewed the piping first using a long stitch then inserted it between the outer ply's you will find that is a lot easier than trying to do it in one go.

                                Regards
                                John

                                #198059
                                Neil Wyatt
                                Moderator
                                  @neilwyatt
                                  Posted by OuBallie on 24/07/2015 14:35:47:ilised fashion

                                  Need to source a supply of dark blue leather, then I'm set.

                                  Keep an eye on ebay for a blue leather sofa! They are so difficult to get rid of people sell leather sofas for next to nothing.

                                  Neil

                                  #198226
                                  OuBallie
                                  Participant
                                    @ouballie

                                    John,

                                    Thanks for excellent advise once again.

                                    You are welcome to pop round any time to show me how it's done, beer/wine waiting

                                    Up until the weekend, I had only been sewing two layers of of folded leather together, but when I tried a loose layer on top of those, that behaved as you warned.

                                    Replaced the foot with one of Teflon and problem solved, but will experiment with the pressure.

                                    Have heard that placing newspaper under leather, sewing through it, helps it slide along, but haven't tried it yet.

                                    Will do some piping as you mentioned, as it sounds easier to do.

                                    I haven't studied different piping, but am not hung up about originality as it's never seen, and I'm not going to make sewing anymore difficult than it need be.

                                    Neil,

                                    Thanks.

                                    I have been keeping an eye on eBay but nothing within 100miles.

                                    The consequence of being out in the sticks.

                                    Geoff – Kitchen duty this morning, preparing mince, pasta and vegetables, and now drooling.

                                    #198613
                                    OuBallie
                                    Participant
                                      @ouballie

                                      Bl@@dy links using the iPad just do not work for me, no matter what I try!

                                      Video of the Singer 660 A1 sewing machine after my first modification to get it to start slowly.


                                      I now need to drill more holes in that extension bar so that I can fine tune where to put that bolt, and then play around with the position of a tension spring, between bar and frame, to see if that will give me more fine control of the start up speed.

                                      Would a Moderator be so kind and fix the link please?

                                      Geoff – Probably time to switch to laptop or desktop, BUT iPad is so convenient!

                                      Edited By OuBallie on 31/07/2015 15:15:19

                                      #198616
                                      Michael Gilligan
                                      Participant
                                        @michaelgilligan61133
                                        Posted by OuBallie on 31/07/2015 15:12:19:

                                        Bl@@dy links using the iPad just do not work for me, no matter what I try!

                                        Video of the Singer 660 A1 sewing machine after my first modification to get it to start slowly.

                                        .

                                        Geoff,

                                        Have a look at your TEST thread.

                                        **LINK**

                                        #199444
                                        OuBallie
                                        Participant
                                          @ouballie

                                          Update at last on slowing the start-up speed of the Singer.
                                          I am now able to get the beast to start at a crawl, but only time will tell if I've been successful once I start serious work using leather.
                                          If not, then a servo motor it will be from College Sewing.

                                          Singer 660 A1 sewing machine

                                          Singer 660 A1 sewing machine


                                          Singer in action

                                          [url=http://youtu.be/E78sn_po_X4]Video/s[/url]

                                          (Link just in case I have brain fade and need to read your lesson again Michael)

                                          Waiting for more colour samples from Leather UK, to see if I can match the rear seat's dark blue leather, but trouble is, that leather is shiny whereas the samples I have are all dull/matt.

                                          No, the shine is not from contact with bums, but ex-factory.
                                          Question is, do all Austin Sevens have such shiny leather?

                                          Now all I have to do, is to get the top thread tension back to what it was before I fiddled.

                                          Geoff – Mad at myself for not leaving well alone.

                                          Edited By OuBallie on 06/08/2015 14:31:19

                                          Yep, as I expected I did have to back to school

                                          Edited By OuBallie on 06/08/2015 14:33:24

                                          #199538
                                          OuBallie
                                          Participant
                                            @ouballie

                                            There are days and then there are days!

                                            I have no idea why there are links to the two photos instead of them appearing in the post, but the best brain fade with regards to the leather supplier though.

                                            UK hide Co. supplied the samples, and the last lot received yesterday had one that is as close a match as I can hope for, e crept for the shine.

                                            Geoff – Lets hope today is better.

                                            #244317
                                            OuBallie
                                            Participant
                                              @ouballie

                                              Completed at bleep last!

                                              Singer 660 A1 sewing machine

                                              Singer 660 A1 sewing machine

                                              Singer 660 A1 sewing machine

                                              Works well

                                              In action

                                              Geoff – I know thinks take a while to get done at Chez OuBallie, but this really is talking the wee wee!

                                              #244331
                                              John McNamara
                                              Participant
                                                @johnmcnamara74883

                                                Hi Geoff

                                                ​Adjusting your sewing machine tension, and most other plain sewing machines.

                                                Great work you are getting the hang of it, I noticed in your pocket mending video that there was a bit of a tangle on the bottom and that you did not hold the thread when you started sewing. While it is not absolutely necessary to hold the thread ends when starting it reduces the chance of a tangle underneath. Oh and when turning to continue sewing use the hand wheel to set the needle down in the work this gives you something to pivot on. Also do not sew over the loose ends in particular the bottom thread, it can get dragged down into the hook causing a tangle, I think that happened in your video,

                                                You mentioned that only in one place did the red thread come up to the top, that indicates that the top tension is a little light or the bottom tension is tight. The ideal tension is when the top tension and the bottom tension are equal, this will cause the top and bottom threads to link into each other in the middle of the fabric or leather, you should be able to see a row of red dots on the top (The bottom threads showing on the top) and the other colour If you are using two colours showing on the bottom. (The top threads showing on the bottom). It is a good idea to use two colours when setting up the machine, it makes the tension adjustments more easily seen. For most actual work you use the same colour top and bottom.

                                                While it is possible to use two different threads it will play havoc with your tension settings. use exactly the same type of for the needle and bobbin. (The top and bottom threads)

                                                One little test worth trying is to fill a bobbin with thread, then insert it in the bobbin case (Through the flat tension spring on the bobbin case as well) then try suspending it by the thread alone. It should not fall unless you jiggle the thread. Yes it is hanging by a thread! if it does tighten the small screw that sets the spring tension. A fraction of a turn makes a big difference here. There are two screws it is the bigger one.

                                                Then try pulling the thread from the bobbin case, it should feel smooth without undue tension, it is very hard to describe this as it varies depending on the type of thread you are using, certainly it will be no strain for your little finger. If the tension is too light the bobbin can over spin when you stop sewing, a good way to get a tangle on the bottom. If it is over tight you will not be able to equalise the tension with the tip thread.

                                                The top needle thread is controlled by threading it through various eyes and two mechanisms, the tension disk's and the tension spring.

                                                The tension disk's have a similar function to the flat spring on the bobbin case they are used to match the tension top and bottom.

                                                If the thread quality and the machine were perfect machine these would be all that is needed. However the world is not perfect and the small tension spring that flips up and down around the tension disk's is there to compensate for small variations in tension caused by flaws in the thread and also to help the thread pull back up from when it goes down with the needle and a loop is pulled off the needle by the hook and base that transfers the loop around the bobbin case forming a stitch. The spring gives the thread a little tug at the right time to help it release from the hook and allow it to be pulled up again by the mechanism.

                                                Normally the tension on the this small spring is quite light, If you switch to a heavy thread and thick needle for leather you may have to increase it a bit. At this stage leave it alone,

                                                Having set the bottom tension you should be able to adjust the tension disk's alone until you get a regular and even stitch pattern. too tight and the bottom thread will show more on top, too low and there will be top thread showing more on the bottom.

                                                I hope this is not too confusing!

                                                Regards
                                                John

                                                Edited By John McNamara on 27/06/2016 16:23:18

                                                Edited By John McNamara on 27/06/2016 16:24:10

                                                #244623
                                                OuBallie
                                                Participant
                                                  @ouballie

                                                  John,

                                                  Thanks for the excellent advice.

                                                  Am using identical thread, other than the colour – (oxymoron?)

                                                  When/how would you use the 'reverse' stitching facility?

                                                  Will do the bobbin test.

                                                  Geoff – Soda blasting IS dusty as I found out yesterday!

                                                  #244651
                                                  John McNamara
                                                  Participant
                                                    @johnmcnamara74883

                                                    Hi Geoff

                                                    Further to the Bobbin test, with a bobbin full of thread inserted in the bobbin case the bobbin case tension should be set so that the bobbin and case can be (Just) held static by the thread, if you lightly jiggle the bobbin and case it will fall by its own weight.

                                                    90% of the time this test is about right for the bobbin tension, you should be able to get a good stitch by setting the top tension discs.

                                                    One point worth mentioning is that (every) part of the machine touched by the thread should be clean and polished. Check inside the tension discs' is the shaft nicely polished? it should be. any rust will make getting a good stitch impossible.

                                                    One other area worth checking and a common cause of bad stitching is the "Needle plate" The half circle plate in the bed with two screws, The hole the needle goes through should be polished with very slightly rounded edges and no burrs. Also check that it is flat across the top with a straight edge. Sometimes it is pushed down by a broken needle. If it is bent take the plate out and carefully straighten it. If the hole is badly scored it should be replaced. it is not an expensive part. If you do need a new one ideally take it to a service centre to match it. The plates are available with different slots for the "Feed dog" the teeth that pull the material through the machine, you have to match them up.

                                                    The reason for the reverse lever is not to stitch backwards it is for "Back tacking", it is there to momentarily reverse the stitching to lock the ends of the stitch line. With fabric the one to two reverses and back is about right. for appearance sake it has to be done carefully. Study a shirt pocket for instance note the neatness.

                                                    On Leather the reverse pattern can be very ugly, Ideally plan your work to avoid doing it where the sewing will show.

                                                    Stitch length?
                                                    Again study say a shirt about 2mm, then study a pair of jeans 2-3mm. Note the differing stitch lengths used by the manufacturer. Then have a look at stitched car upholstery often about 3-4.5mm, note how the stitches are further apart. Vinyl and leather requires a longer stitch length, this is because the vinyl or leather will be damaged by a fine stitch, too fine a stitch and the material will be weakened or even cut.

                                                    Lubrication:
                                                    I do not know if your particular machine has a sump and a pump? Even if it does there will probably be points that have to be oiled. The correct lubricant is water white (clear) machine oil. get it from an industrial sewing machine dealer.

                                                    When you place the bobbin and its case in the machine you are putting it in the "hook and base" this is the heart of the machine, it is the little bit of metal magic that forms the stitch. Nearby in the bed is a reservoir that feeds it with oil via a hidden wick or tube. Study it you will see a hardened steel on hardened steel bearing area around the centre part. It must never be run dry, make sure the oil is getting to it. If it is dry add a drop of oil and find the reservoir and fill it with oil.

                                                    Always stitch a sample before you start a job you have not done before. Try to tear it apart pull and poke it until you are satisfied with the result.

                                                    Regards
                                                    John

                                                    Edited By John McNamara on 29/06/2016 13:50:56

                                                    #244931
                                                    OuBallie
                                                    Participant
                                                      @ouballie

                                                      Hello John,

                                                      Played around with bobbin tension as well as the top tension then wondered why the top thread kept snapping.

                                                      Checked everything then noticed what I thought was fluf on the top tension check spring only to discover that somehow I had looped the thread round it.

                                                      Fixed that and after more adjustment I'm happy for now, but will only find out once I experiment with the material I will be using on the car.

                                                      New needle plate fitted as the machine didn't have one.

                                                      When I got the machine I cleaned the mechanism as best I could, removed the end cover and found all the pieces of lubricating felt bone dry so soaked them in Singer oil.

                                                      Every moving part was lubricated and machine turned by hand then left overnight before powering up.

                                                      I think there is too much oil in felt strips, as it is running down the needle bar, but not as much as first.

                                                      The sump was empty, so duly filled, and I check the level before using the machine.

                                                      No mention of an oil pump in the manual.

                                                      Thanks for the advise on 'back stitching', something I didn't know about, but how do you stop the stitch coming loose if not used?

                                                      Geoff – Getting there albeit slowly.

                                                    Viewing 25 posts - 1 through 25 (of 26 total)
                                                    • Please log in to reply to this topic. Registering is free and easy using the links on the menu at the top of this page.

                                                    Advert

                                                    Latest Replies

                                                    Home Forums General Questions Topics

                                                    Viewing 25 topics - 1 through 25 (of 25 total)
                                                    Viewing 25 topics - 1 through 25 (of 25 total)

                                                    View full reply list.

                                                    Advert

                                                    Newsletter Sign-up