co-axial indicators

Advert

co-axial indicators

Home Forums General Questions co-axial indicators

Viewing 25 posts - 1 through 25 (of 35 total)
  • Author
    Posts
  • #510895
    bricky
    Participant
      @bricky

      I have been considering buying one.I have been using a laser and sticky pin until now and would like opinions on the co-axial indicator before I buy.

      Frank

      Advert
      #27800
      bricky
      Participant
        @bricky
        #510897
        Emgee
        Participant
          @emgee

          Frank

          Check the distance you have between the tool end and the work, allow for the height of a rotary table if you use one, those co-axial indicators a pretty long overall, even with a short probe fitted.

          If you have the space and money then go for it, they seem to be very accurate and easy to use.

          Emgee

          #510900
          JasonB
          Moderator
            @jasonb

            You may also want to look at this current thread where they get a mention.

            #510903
            Henry Brown
            Participant
              @henrybrown95529

              I have the one from DRO (Link) and don't rate it TBH, ok for rough clocking .002/.003" which I rarely do, I'd much rather use a finger DTI. I believe the expensive ones are very good, the jig borers where I worked used to use them but they were thousands of pounds.

              #510909
              Baz
              Participant
                @baz89810

                Henry, used to use a similar thing at work and they worked ok, also good on the Myford for checking alignment of tailstock, run it on the end of the morse taper and you will see if tailstock is aligned with the spindle. All the jig borers I have worked on used centrescopes and edge blocks for setting zeros, also used the centrescopes a lot on the lathe.

                #510913
                Clive Foster
                Participant
                  @clivefoster55965

                  They are quite long which rules out use on many model engineers machines. There isn't enough daylight. Even on a Bridgeport fitiing vice, job and indicator in can be difficult.

                  Judging by the colour and box the one Henry links to is the same as the one I've had for 15 (or more) years. I reckon errors under 1 thou TIR are quite realistic once you have got the technique sorted and learned your way round some price related engineering infelicities.

                  As always with null indicators its actually pretty tolerant of set-up and other errors. But, inevitably, being an inexpensive device it can drive you nuts when it doesn't want to play the way you think it should do.

                  Aligning bores is where they are most useful. If you aren't planning to do bores the money is probably better spent elsewhere. Objectively the expenditure on mine wasn't really justifiable but now I have it I use it.

                  For outside work its hard to beat Osborne's Manoeuvre (or whatever your oracle calls it) using a cylindrical probe in the spindle chuck or collet and a thin feeler gauge to detect contact. The force needed to pull out the feeler gauge being a very sensitive measure of contact pressure.

                  Clive

                  #510920
                  Anonymous

                    My Haimer Centro claims a centring accuracy of ±0.003mm. A quick look online and some of the cheaper units don't seem to quote any accuracy. That's strange, and rather worrying, for a device that is supposed to offer precision by its very nature. I expect that for co-axial indicators you really do get what you pay for.

                    Andrew

                    #510936
                    Henry Brown
                    Participant
                      @henrybrown95529
                      Posted by Baz on 30/11/2020 18:59:44:

                      Henry, used to use a similar thing at work and they worked ok…

                      Hi Baz, I thought mine was ok until I checked the part I had zeroed with it and it was .003" out. I took it apart and found that it was quite crude and the scissor movement had quite a lot of sideways slop which I managed to take out with some washers made from shim which improved matters a little but I'm afraid I don't trust it now,

                      Old, old story I guess, you pays your money…

                      #510938
                      bernard towers
                      Participant
                        @bernardtowers37738

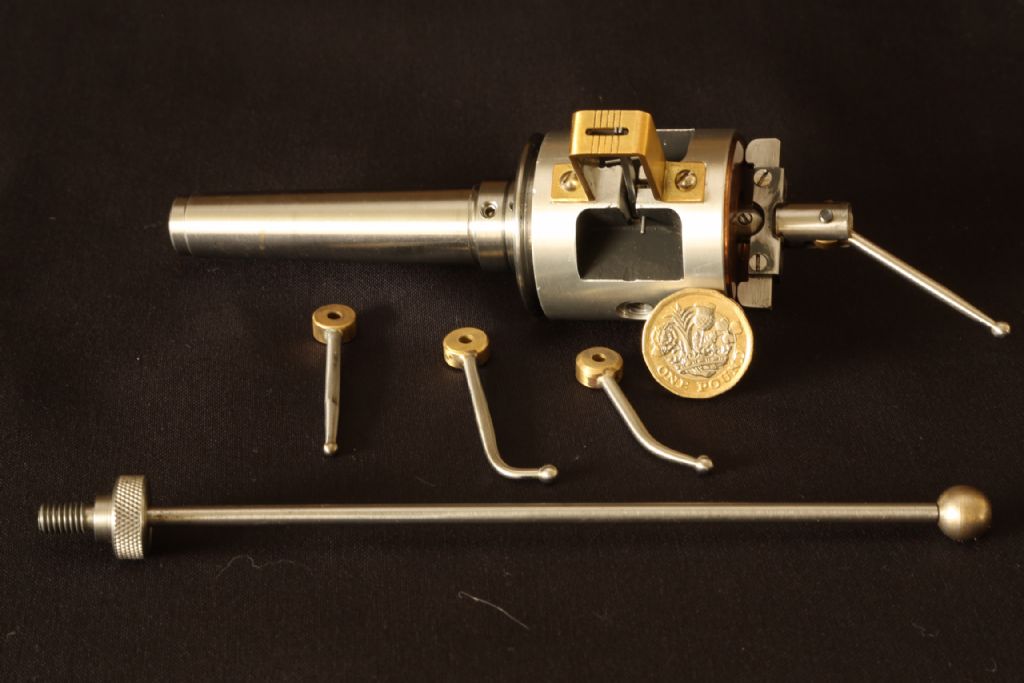
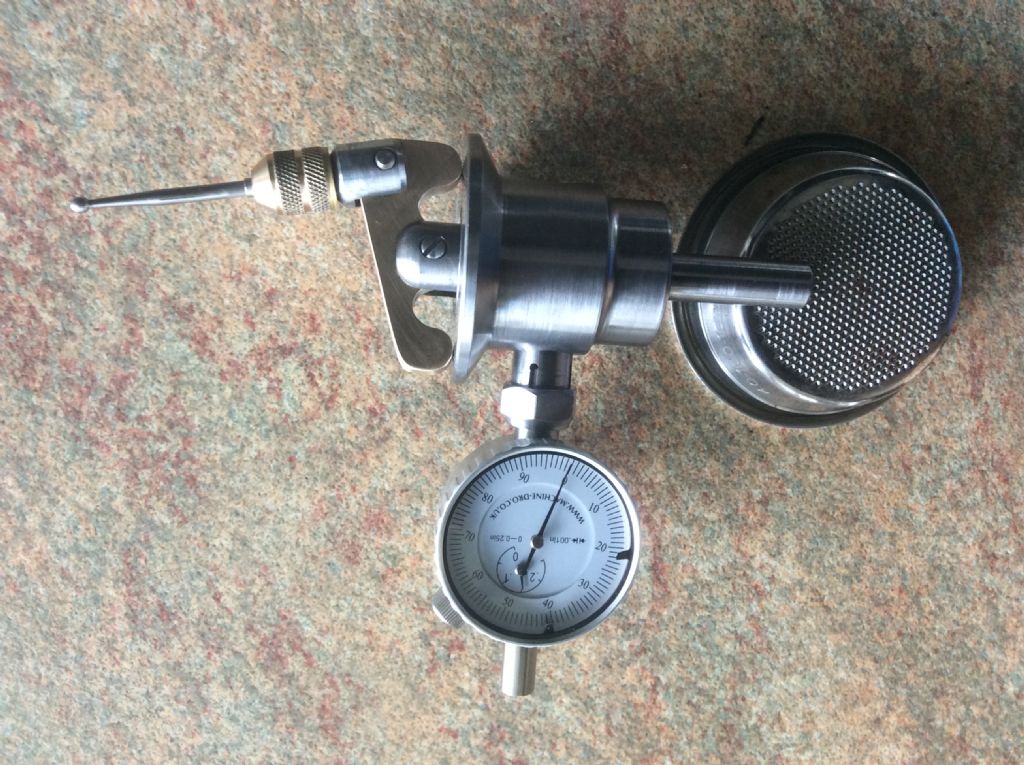
                        6dbf7fcb-cf00-40ff-a368-f4334e879ac6.jpegb9906cbc-1406-4979-9b6f-c532f5aa3709.jpegAs I have a small mill (raglan) commercial coax indicators are far too long so made my own. The first one is my own design and the second is from an image from the net. Both work really well and making them fit close to the machine spindle saving even more space

                        #510940
                        Iain Downs
                        Participant
                          @iaindowns78295

                          I got one a year ago for Amadeal which was around 80 quid.

                          What I found was that, if there was significant run out, then you got inaccurate results. The run out in this case was due to the chuck provided with it. The fact that there is a lot of air makes this worse.

                          When used with well set up equipment it decently accurate and really quick to set up.

                          Having said that, I'm hoping that my Xmas will include an indicator holder that attaches to the spindle of the mill as used by Joe Pie (on You Tube). This won't be quite as quick to use, but on the other hand you appear to be able to use it without swapping collets / chucks so it may end up equally quick and possibly more accurate.

                          Both Machine DRO and ARC sell one and they are a good deal cheaper than an coaxial indicator.

                          Iain

                          #510946
                          Clive Foster
                          Participant
                            @clivefoster55965

                            Andrew

                            To be fair quoting useful accuracy figures for the typical "Blake knock off" co-axial indicators is difficult because the actual dial calibration depends on the length of the probe fitted and its operating angle relative to the workpiece.

                            Its non linear too.

                            Basically just a dial indicator with a double sided rocker drive to change probe tilt variations due to assymetry between workpiece and indicator into vertical displacement that the dial gauge can read.

                            The Hamier is a seriously different instrument as it actually has measurement capabilities rather than being a pure null indicator.

                            Blake, who invented the thing, claim 5 thou per division of a 40 division dial when using a 2" long probe with a centering accuracy within 0.0002" for the premium version and 0.001" for the economy one. The website implies that a 0.0005 thou per division dial gauge is fitted. **LINK**.

                            Out in the real world its easy enough to test by introducing a known sideways displacement after you have it centred and seeing how much the indicator needle displacement varies by. Even centred it seems impossible to avoid a trace of needle flicker even with a very smooth surface.

                            I went through a test procedure with mine shortly after buying it and concluded "not bad for cheap crap, I can use it." The big imponderable is just how true the rocker pivot rotational axis is relative to the machine axis as any error will induce a constant offset into the centre of the needle flicker range. Mine probably has an error but its manageable with short probes. Long probes have other frustrating issues to work round.

                            If you concentrate it is possible to get a bore centred under the machine spindle with sufficient accuracy that a test piece made concentric to a spigot and held in a collet needs only to be around 2 thou smaller in diameter to quite easily enter the bore. So ± 1 thou appears possible with mine but its harder work than I'd routinely do. Within 5 thou, not necessarily ± 2.5 (!), is more like it and quick to achieve.

                            It is what it is.

                            Apologies for typo in first post using TIR when its not really appropriate. Thinking of indicator needle movement without factoring in probe length.

                            Clive

                            Edited By Clive Foster on 30/11/2020 22:09:12

                            #510963
                            thaiguzzi
                            Participant
                              @thaiguzzi

                              Got an American friend to bring one over from the States in his suitcase. A nice repro of the Blake by Shars.

                              Takes a while and a few goes to get the hang of it, but once familiar and confident with said doo-dad, the thing works very well, and very fast. I only work to a thou or a tad less, and it is much faster than a lever type indicator.

                              And no using a mirror or getting neck ache peering round the back of the work.

                              #510978
                              Jed Martens
                              Participant
                                @jedmartens56976

                                I have one. I never use it. It's probably the only tool that I wish I hadn't bothered buying.

                                As others have said, it takes up a lot of vertical height. The issue isn't "daylight" in my case (SX3 mill) but the fact I have to crank the head all the way up to fit the indicator, and then all the way back down once I've finished with it. That's a pain in itself, but I have little confidence that alignment is maintained over that much vertical head travel.

                                I just use a DTI. Which I find frustrating much of the time, but it works and involves little head travel.

                                Jed

                                #510988
                                Anonymous
                                  Posted by Clive Foster on 30/11/2020 22:05:32:

                                  To be fair quoting useful accuracy figures for the typical "Blake knock off" co-axial indicators is difficult because the actual dial calibration depends on the length of the probe fitted and its operating angle relative to the workpiece.

                                  Surely the important parameter is how accurately the centre is located when the needle movement is nulled. I don't see that has anything to do with the calibration of the indicator itself? Although of course one would need to make an independent measure of the centre to get the numbers.

                                  Andrew

                                  #510997
                                  Stuart Bridger
                                  Participant
                                    @stuartbridger82290

                                    I have an unbranded unit and it does get used fairly frequently. The headroom point raised by many is very valid.
                                    I have a Warco VMC and use an R8 collet to get the indicator as close to the spindle as possible.

                                    #511011
                                    blowlamp
                                    Participant
                                      @blowlamp

                                      The neat thing about using a rotary edge finder – and in particular along with a DRO centre function – is how the centring accuracy 'homes in' if you repeat the procedure once or twice.

                                      Martin.

                                      #511013
                                      Baz
                                      Participant
                                        @baz89810

                                        Jed totally agree about winding the head all the way up and then down again, don’t know about alignment on Chinese made machines but I do remember 40 years ago working on an Arboga milling machine and the head used to move ten thou sideways when it was moved from fully up to fully down, machine was perfectly fine providing everything was done at one head setting and within the range of travel of the quill.

                                        #511038
                                        Clive Foster
                                        Participant
                                          @clivefoster55965

                                          Andrew

                                          As its a single point being swept around a rotational axis defined by the spindle all mechanical and offset errors are, supposedly, the same regardless of angular position and cancel out. So mechanically speaking null is null and, theoretically, zero error is possible.

                                          In practice it depends on the quality of the mechanical connection between the probe and the gauge which should register the same offset for any error regardless of its angular position. Realistically anything better than within ± one of the half divisions on the gauge is down to judgement and guess. Certainly unquantifiable.

                                          Gauge needle sweep on mine is a little speed sensitive too. Turning the spindle by hand to do point to point measurements is not effective. With a long probe side to side shifts at the business end due to drag variations can clearly be seen. Mine likes 150 to 300 rpm. Presumably this gives sufficient drag to stabilise the probe lag but is not fast enough to upset things. As the Bridgeport is varispeed a quick twiddle to fined a happy speed is easy.

                                          Always assuming the object or bore is properly round. Egg shapes or out of round engine cylinder wear can clearly be seen with the spindle running slowly.

                                          All sorts of hysteresis and dynamic effects getting involved not to mention surface quality and any non linearities due to imperfections in the mechanism. If nothing else a dial gauge isn't supposed to be a dynamic device at 5 to 10 Hz or thereabouts so its asking a lot of (a cheap) one to read truly centred variations.

                                          I'm darn sure that the true zero isn't quite at the centre of the needle swing on mine. Its also quite happy to read a one or two thou ding.

                                          But is quick and close enough for most jobs. If I really want accuracy I'll break out the mirror and tenths thou Verdict then get a bit creative with the DRO. One day I might learn to use my Hamier!

                                          Folk tend to forget that a thou' is pretty darn small and project unreasonable expectations on what is, when all is said and done, an inexpensive device. I always approach mine in the same spirit as I would a Unique pressed tin dial gauge substitute.

                                          Clive

                                          #511068
                                          bricky
                                          Participant
                                            @bricky

                                            The helpful response has made my mind up and I have just bought a new mitutoya lever dti.My old one was second hand bought from a retired turner which came with attachments that didn't fit.A pig in a poke,I felt so stupid that I hadn't tested it before buying that I didn't complain.

                                            Frank

                                            #511166
                                            thaiguzzi
                                            Participant
                                              @thaiguzzi
                                              Posted by blowlamp on 01/12/2020 11:22:24:

                                              The neat thing about using a rotary edge finder – and in particular along with a DRO centre function – is how the centring accuracy 'homes in' if you repeat the procedure once or twice.

                                              Martin.

                                              What's a DRO ? smile d

                                              #511206
                                              blowlamp
                                              Participant
                                                @blowlamp
                                                Posted by thaiguzzi on 02/12/2020 09:13:31:

                                                Posted by blowlamp on 01/12/2020 11:22:24:

                                                The neat thing about using a rotary edge finder – and in particular along with a DRO centre function – is how the centring accuracy 'homes in' if you repeat the procedure once or twice.

                                                Martin.

                                                What's a DRO ? smile d

                                                It's a Digital ReadOut.

                                                Just for information, they usually have a centring function whereby you 'touch off' the first edge and zero the display, then 'touch off' the opposite edge (the reading might be say 37.42mm), press the Half button (centring function) and the display will read 18.71mm. Moving that axis until the DRO displays zero now means you are at the centre of the part.

                                                Martin.

                                                #511240
                                                old mart
                                                Participant
                                                  @oldmart

                                                  The thing you must understand about these tools is that they are NOT for measuring. The length and angle of the probe used all affect the scale divisions on the dial. They are intended for adjusting the cylindrical work into alignment with the axis of the spindle and nothing else. As long as the needle does not move that is all that is required.

                                                  #512076
                                                  thaiguzzi
                                                  Participant
                                                    @thaiguzzi
                                                    Posted by blowlamp on 02/12/2020 11:37:53:

                                                    Posted by thaiguzzi on 02/12/2020 09:13:31:

                                                    Posted by blowlamp on 01/12/2020 11:22:24:

                                                    The neat thing about using a rotary edge finder – and in particular along with a DRO centre function – is how the centring accuracy 'homes in' if you repeat the procedure once or twice.

                                                    Martin.

                                                    What's a DRO ? smile d

                                                    It's a Digital ReadOut.

                                                    Just for information, they usually have a centring function whereby you 'touch off' the first edge and zero the display, then 'touch off' the opposite edge (the reading might be say 37.42mm), press the Half button (centring function) and the display will read 18.71mm. Moving that axis until the DRO displays zero now means you are at the centre of the part.

                                                    Martin.

                                                    My apologies. I was being sarcastic.

                                                    #512893
                                                    Peter Jones 20
                                                    Participant
                                                      @peterjones20
                                                      Posted by Andrew Johnston on 01/12/2020 09:59:32:

                                                      Posted by Clive Foster on 30/11/2020 22:05:32:

                                                      To be fair quoting useful accuracy figures for the typical "Blake knock off" co-axial indicators is difficult because the actual dial calibration depends on the length of the probe fitted and its operating angle relative to the workpiece.

                                                      Surely the important parameter is how accurately the centre is located when the needle movement is nulled. I don't see that has anything to do with the calibration of the indicator itself? Although of course one would need to make an independent measure of the centre to get the numbers.

                                                      Andrew

                                                      I agree. I find it very useful for tramming using longest probe and a motorcycle brake rotor on mill table (checked for flatness and parallelism)

                                                      Spinning a 12"+ circle with long lever arm cuts down any inaccuracy compared to a 2" lever (or rather, magnifies problems )

                                                      Checking with a lever arm DTI gives lower resolution (0.0005&quot

                                                    Viewing 25 posts - 1 through 25 (of 35 total)
                                                    • Please log in to reply to this topic. Registering is free and easy using the links on the menu at the top of this page.

                                                    Advert

                                                    Latest Replies

                                                    Home Forums General Questions Topics

                                                    Viewing 25 topics - 1 through 25 (of 25 total)
                                                    Viewing 25 topics - 1 through 25 (of 25 total)

                                                    View full reply list.

                                                    Advert

                                                    Newsletter Sign-up