One solution of course, is to use a more substantial belt for the transmission and the type of plastic belting which can be cut to length, the ends heated and pushed together to form a join, is probably more economical and durable than the branded make. This form of belting was used successfully on my machine until the idea of using a toothed belt came along.
A positive drive
Enjoy more Model Engineer reading in the monthly magazine.
Click here to subscribe & save.
After converting and using the Unimat with the toothed belt drive, apart from the belt having a lifespan many times that of the ‘rubber’ original, it has also been found to give a much more positive drive, together with the bonus of allowing a much heavier cut with the lathe tool when required.
It would be unfair to imply that any modification is all-positive and a downside to this one, is the loss of a selection of speeds, leaving just the two from the motor, (which may be found adequate), so a motor speed controller has been added, as compensation. If the machine is being used for woodturning where higher speeds are needed, then perhaps the modification as it is, may not be suitable. One other disadvantage is a slight rise in noise level, which the original belt absorbed more readily.
Unimat SL belts
One of the small Unimat SL belts is used for transmission from the motor to the intermediate pulley, but as this earlier machine is no longer available, neither are the official belts. (Our Editor kindly reminded me of the information published in issue No 124 of a source). An alternative, which seems to be working reliably to date, has been to utilise a Hoover ‘Junior’ vacuum belt, which can easily be obtained locally. They are slightly larger in cross section and must be kept free of oil, which causes the rubber to deteriorate.
Although the belt for my own machine, was obtained as mentioned previously, there are suppliers who will supply these in quantities from one and upwards. The following data on these belts, has been kindly supplied by one of the counter staff at a branch of one such supplier, from which a spare belt was purchased and which may be of use to anyone wishing to fit a different size belt to a piece of equipment.
The toothed belt
Using the code No 114/XL/037 of the belt, which was, used as sample, the first number indicates the length or circumference and is equal to, twice the number of teeth, XL is the type code for 0.2in. pitch of the tooth and the digits 037 suggests that the belt is 3/8 in wide, so the sample belt has 57 teeth, a circumference of 11.4in. and is .0375in. wide. Having an odd number of teeth, the sample it was said, indicated a non-standard item, whereas a standard belt will have an even number of teeth.
Brand names are :-Optibelt, Bando, Gates and Goodyear. For this project a belt with code number 110/XL/025 was an ‘in stock’ item and arrived by post about six days after placing the order.
Using the same basic formula to calculate for the 40 tooth wheel as an example, its circumference C will be 40 x 0.2in (pitch of tooth) = 8 and 8 divided by p = 2.5464in. The result of this calculation, however, produces an oversize diameter. After a number of calculations and comparisons with those of the salvaged wheels, acquired as previously mentioned, the difference was always 0.033in., so the formula arrived at is:- D = (C¸p)-0.033, (all values in inches).
Although there were no salvaged wheels to measure, this same difference when deducted from the initial diameter was arrived at. The wheels having 8 and the 40 teeth respectively were produced, by gradually reducing the diameter and adjusting the tooth depth in accordance, until a correct mesh was achieved, when a belt was wrapped around the circumference.
The cutters
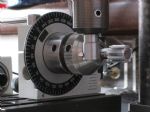
A 2.5mm end mill, is a close enough alternative to the 0.1in. required. It is easier to use and a worthwhile buy, if only for the comfort alone, photo 2. Another advantage of using an end mill, is the less likelihood of it making contact with the division plate, whereas the arc for a single point cutter is much bigger and the space between the blank for the large wheel and the dividing plate would have to be increased, thereby making a less rigid set-up. It’s worth checking, that the end-mill is a true 2.5mm. Whilst making a second wheel using an end-mill that was believed to have been the one used earlier, it appeared that on the second gap being cut, things didn’t look quite right. On checking the cutter, although the shank was engraved with 2.5mm it was also marked 1/8in., which is much too big for this purpose.
A salvaged wheel
Shaping of the cutter for the small wheel was derived from the simple method of filing, comparing the profile against a ‘salvaged’ wheel, then translating the result so that the shape could be formed mainly on the milling machine and completed with a minimum of filing. Making the cutter is a simple enough task, but the following explanation may be of some benefit. Chuck a suitable piece of round silver steel and mount the chuck on the dividing head, with the 40-division plate fitted.
Set the dividing head on the milling table, so that the top face of the cutter can be removed with a 6mm or 1/4in. end mill. Reposition the dividing head with the axis of the chuck offset by 20 degrees. Rotate the chuck by one division of the plate so that the angle of the side of the cutter can be formed using the side of the end mill. Remove enough of the material so that a pointed tool will be produced when the other edge is removed in a similar manner and with the dividing plate turned one notch in the opposite direction. Set the chuck on the lathe and take 2.5mm or 0.1in. from the point of the tool. Angle the leading or flat end with a file and round off the corners, make a flat on the shank for the screw of the holder, then finish the shape with a polish on a fine stone, ready for hardening.
A tempering tip
If a cutting tool with parallel sides is to be made for the drive wheel, the same method can be used but without the 20 degree offset of the dividing head. A tip given to me by an old engineer for tempering such small tools is to suspend the item in a pan of boiling water for about ten minutes after hardening in the usual way, a method which, from my own experience, has been most successful. Photo 1 shows a double cutter with the extended part working on the small wheel and the other parallel end that can be seen is that for the drive wheel, which was not used due to the noise problem.
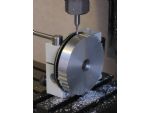
A threaded bush to take the screw of the hob of the threading attachment fits into the boss of the drive wheel and is optional, photo 3. If the attachment is not one of the included accessories then the boss may as well be omitted. Taking such a large amount from the wheel blank to form the boss is not necessary if a press-fit insert is used instead.
If a hole gauge is not available then prior to setting up the blank, turn a stub of round bar to the same diameter as the unthreaded part of the lathe mandrel, where the wheel will be finally located, for use as a gauge when boring this part of the drive wheel. Once the work is in place on the lathe, the centre should be bored and threaded 14x1mm and the unthreaded counter bore cut and measured using the short gauge made previously. Then using a left-hand turning tool, face off the front following with a finishing cut.
Remove the blank from the faceplate and mount it directly on to the lathe spindle for facing the other side and turning the diameter with the same tool. Transfer the blank to the mandrel of the dividing attachment for the gaps of the teeth to be cut. Use a spacer between the work and the 40-division plate, which is thick enough to allow room for the cutter. Photo 2 shows the setup on a different machine and is not due to any difficulty with the Unimat but entirely for convenience sake when taking the picture.
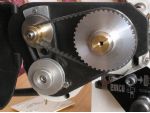
Cutting the smaller wheel, photo 1 is not such a tedious job compared with the big wheel. The blank is first bored through 8mm and secured to an arbor of the same diameter and with enough of the arbor between the blank and the chuck to allow room for the radius of the cutter when the teeth are to be formed. After turning the blank to size, the chuck with blank can then be transferred to the dividing head for the teeth to be cut. Ensure that the dividing head is well secured, as the hammer action of the cutter, will easily cause the attachment to go out of alignment.
Concentricity
To keep the components of the pulley assembly concentric, the phosphor bronze insert is cut a bit longer than finally required, then drilled with a pilot hole for boring and reaming, then set between centres to be used as a mandrel on which to build up and machine the pulley assembly.
Secure the pulley blank with epoxy resin or a press fit onto the insert and shape up the pulley. Turning the groove for the rubber belt in the intermediate pulley is a bit of a task for the Unimat and in my case a mixture of lathe tools, from pointed, parting and the final round nose were used. Cut the groove to a depth of 4mm and wide enough to allow the shank of a 5mm drill, to lie comfortably.
Next, fit the spacer flange and adjust its thickness to bring what will be the centre of the small-toothed wheel into the correct place. Secure and trim the width of the small wheel before finally fitting the outer flange and finishing the assembly.
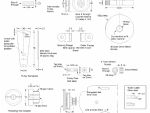
Distances of the centres of both the intermediate pulley and the toothed wheels in relation to the backplate are shown in the drawing for use in aligning the centres should there be any deviation from the dimensions shown.
Tensioning the belt
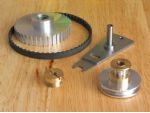
For tensioning the toothed belt, the intermediate pulley assembly has its own backplate, photo 3 that can be partially rotated around the axis of the motor shaft. A notch at the lower edge of the plate keeps the intermediate pulley and rubber belt at the correct radius from the motor shaft, whilst two screws are used for clamping the plate after the adjustment of the toothed belt. Space for the clamping screws is limited, leading to the top screw having to be fitted from the lathe side of the motor backplate in order to avoid the rubber belt, whilst the position for the head of the bottom screw is very close to the pulley and the motor adjustment slots.
Co-ordinates for the bottom position in the pulley backplate and the two in the motor backplate are not given, but will be found later during the installation of the pulley assembly. The lower edge of the pulley plate needs to be thin enough to slide between the motor pulley and the backplate and once the adjusting screws have been tightened there should be little friction with the motor shaft. Using thin brass sheet for the thinner part of the adjustment plate, would save damage to the motor shaft, if this is of any concern.
Fitting the new drive
When all the lathe work has been done and the backplate is ready to be modified, remove the existing pulley post and then with the motor in place, slide the bottom end of the pulley backplate into place and file the thickness if there is any contact with the motor pulley. Put the new pulley unit on the new post and with the backplate laid flat and the large drive wheel alongside, put the toothed belt around the two. Pull the belt taut and hold it in place with a weight (or that extra hand that all engineers seem to have) and using a small clamp to hold it in place, mark through the top screw hole of the pulley backplate and onto the motor backplate. Remove the pulley etc. and from each side of this point, mark and drill for two holes to form a short elongated slot.
Once the slot has been cut, the pulley backplate with the pulley in place can be secured with a screw for the location of the bottom fixing to be selected, this time with the elongation filed in the pulley backplate and a tapped hole to suit the motor.
Speed control
For a small measure of speed control for the motor, a domestic light dimmer has been used. With a maximum rating of 250 watts, it is well in excess of the 90 watts of the Unimat motor. A power drill module was utilised originally in the belief that this would be more suited for the new purpose only to find after much time spent in its modification and a very little time running the motor, the circuit developed a fault causing the motor to run at full speed. However, this experience turned out to be an advantage and the lamp dimmer, which had been thought of originally, proved to have a much better control and power output and with very little work involved in making it look presentable.
Although the controller will vary the speed of the Unimat motor of my lathe, when either of the motors own speeds are selected, a better output is obtained when its switch is set to the low position but other modules may need the same switch set to the high position. When the switch on my machine is set to the high position, the speed can be set from zero upwards, but the power is very low and the motor stalls as soon as the lathe tool touches the work. With the older motors using a centre-off/speed switch, it’s so easy to press the switch into the wrong position and a safeguard could be to use the lamp dimmers own on/off feature, or a separate switch could be added for the motor to be turned on and off without the need of adjusting to the required speed each time.
As an extra precaution, a small ventilated panel has been added to the rear of the enclosure. How warm the unit gets is not known, but if it can survive the enclosed conditions of a light switch enclosure, then it surely will not come to any harm in a more spacious box.
Mounting the control box
Belt Supplier
BSL Brammer Ltd
Belt part No 110/XL/025


